


















4x4–4x6 Bathroom Saunas: Contractor Ready Checklist and Heater Picks
Yes, a sauna in bathroom space is realistic for most homeowners once you plan around footprint, ventilation, and electrical capacity. Your first move: measure the usable floor area and check your panel for available circuits. A compact electric or infrared cabin is the simplest path structurally, while a steam-shower conversion asks more of your waterproofing and drainage.
TL;DR:
- Infrared saunas produce less moisture, making them easier to install in bathrooms with limited waterproofing, especially in shared or humid spaces.
- The typical minimum room size for a comfortable sauna is at least 16 square feet with a ceiling height of 7 feet, while larger spaces improve comfort and heat distribution.
- A 4x4 sauna generally requires a 4.5 kW heater on a dedicated 240V circuit, and larger rooms may need up to 6 kW with appropriate electrical capacity.
- Proper ventilation involves an intake low on the wall and an exhaust high on the opposite side, critical for preventing mold and structural damage over time.
- Installing a sauna usually costs between $8,000 and $15,000 if planned early in a remodel, with electrical and framing work being the main cost drivers.
Table of Contents
- Which Sauna Types Work Best in a Bathroom
- How Much Space Does a Bathroom Sauna Actually Need?
- What Electrical Work Does a Bathroom Sauna Require?
- How Do You Handle Ventilation and Moisture in a Bathroom Sauna?
- What Materials Should You Use for a Bathroom Sauna?
- How Much Does It Cost to Add a Sauna to a Bathroom?
- Which Conversion Path Fits Your Bathroom Best?
- Is a Bathroom Sauna Safe, and How Do You Keep It Clean?
- What Should Be on Your Contractor Handoff Checklist?
- Is a Bathroom Sauna Worth the Investment?
- How Sauna Heater Supply Helps You Move From Planning to Purchase
- Sources
- FAQ
Which Sauna Types Work Best in a Bathroom
The right sauna type depends on how much moisture your bathroom can tolerate and how much construction you’re willing to take on. Each option puts different stress on the room’s structure, so the choice isn’t just cosmetic.
Traditional Finnish saunas use wood interiors and an electric or wood heater to produce dry heat, usually with low relative humidity even at high temperatures. They deliver the classic sauna experience but require full insulation, a vapor barrier, and tongue-and-groove paneling, which makes them the most construction-intensive option for a bathroom retrofit.
Infrared cabins run at lower air temperatures, commonly 110 to 140°F, and produce no steam at all. Because they don’t build ambient humidity the way a Finnish sauna does, infrared units put far less stress on drywall, grout, and cabinetry nearby. They’re also modular, which means many models install with less carpentry and no dedicated ventilation overhaul. For a shared bathroom where you’re worried about moisture migrating to vanities or flooring, infrared is usually the gentler choice. You can compare the two more closely in this infrared versus traditional sauna breakdown.
Steam-shower conversions are a different construction problem entirely. A steam generator pushes saturated vapor into a sealed enclosure, so the entire space needs continuous waterproofing, a sloped floor to a drain, and a fully gasketed door. This is the option most likely to require rethinking your existing shower pan.
Portable options, including tent-style infrared units and pop-up steam pods, skip construction altogether. They’re the right call for renters or anyone who wants to test whether they’ll actually use a sauna before committing to a build.
- Traditional Finnish: authentic heat, highest construction demand, driest air
- Infrared: lowest moisture stress, modular, faster install
- Steam-shower: highest waterproofing demand, full drain integration
- Portable: zero construction, limited size and durability
How Much Space Does a Bathroom Sauna Actually Need?
A functional sauna can technically fit into as little as 1 square meter, but that’s a theoretical floor, not a comfortable one. The practical minimum most builders work from is 16 square feet, a 4 by 4 foot footprint, and anything smaller starts to feel like a phone booth. If two people will use it, or if anyone wants to recline on a bench, plan for 4 by 6 feet instead.
Ceiling height matters just as much as floor space. Most cabin saunas are built for 7 feet of clearance, which keeps heat properly stratified above the bench without wasting energy heating dead air near the ceiling.
Here’s how to translate those numbers into a layout you can hand to a contractor:
- Measure your usable floor area first, subtracting any swing space needed for the bathroom’s main door.
- Decide on bench configuration. A single bench needs about 24 inches of depth; an L-shaped bench for two needs closer to 4 by 6 feet total room footprint.
- Plan the door swing outward, never inward, so a person who feels faint can push their way out without resistance.
- Check corner placement options. Repurposing an existing shower stall in a corner often saves the most floor space, since two walls are already framed.
- Calculate room volume (length times width times height in cubic feet) before choosing a heater, since undersized heaters struggle to reach temperature in taller rooms.
For exact bench dimensions across common footprints, this sauna bench layout guide breaks down templates for 4x4, 4x6, and larger rooms.
What Electrical Work Does a Bathroom Sauna Require?
Heater sizing and circuit capacity are non-negotiable, and this is the section to bring straight to your electrician. A 4x4 room typically calls for a 4.5 kW heater, while a 4x6 room usually needs closer to 6 kW, both on a dedicated 240V circuit. That circuit almost always runs on a 30 amp breaker for heaters in the 4.5 to 6 kW range, though your electrician will confirm the exact amperage against the heater’s nameplate rating.
A few electrical rules apply across nearly every install:
- The heater needs its own dedicated 240V circuit, never shared with lighting or an existing bathroom outlet.
- A disconnect switch must be installed within sight of the heater for safety shutoff.
- The control panel mounts outside the sauna enclosure, not on an interior wall near the heat source.
- Junction boxes and wiring inside the sauna must be rated for high-heat, high-humidity environments.
- Most jurisdictions require an electrical inspection whenever a new dedicated circuit is added, so factor that into your timeline.
Infrared cabins are the exception to some of this. Many plug-in infrared units run on a standard 120V, 20 amp household circuit, which is one reason they’re popular for bathroom retrofits where adding a 240V line isn’t practical.
Pro Tip: Give your electrician the room’s cubic footage, not just square footage, before they quote the job. Heater kW recommendations are based on volume, and a taller-than-average ceiling can push you into the next heater size up.
For a full breakdown of amp mapping by heater size, see this sauna power requirement guide.
How Do You Handle Ventilation and Moisture in a Bathroom Sauna?
Ventilation placement is arguably the single factor that determines whether your sauna lasts ten years or starts showing mold in two. The standard layout places a fresh-air intake low on the wall near the heater, with an exhaust vent high on the opposite wall, creating a cross-flow that pulls heated air up and out while pulling cooler air in low.
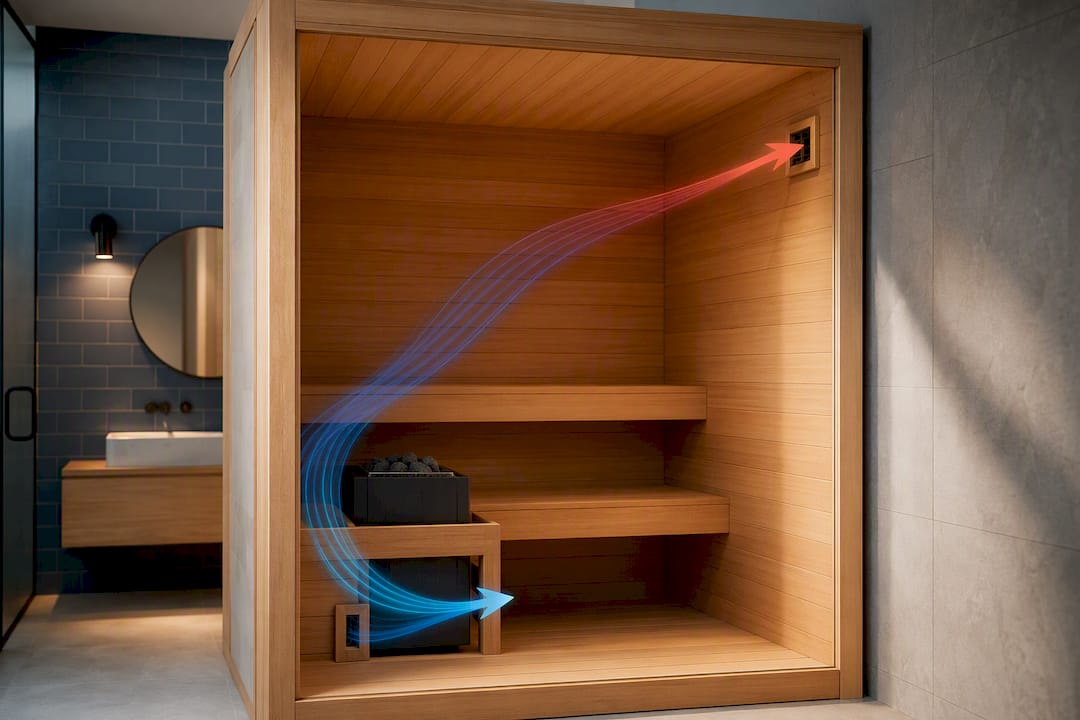
Where a bathroom already has an exhaust fan, you may be able to integrate the sauna’s exhaust path into that same duct run, though a dedicated fan sized for the sauna’s volume is often more reliable. Skipping ventilation entirely to save on construction cost is the single most common mistake in DIY builds, and it’s the one that causes the most expensive repairs later.
Behind the interior paneling, a proper vapor barrier is what actually protects the surrounding bathroom structure:
- Vapor barrier goes on the warm side of the insulation, directly behind the wood paneling, sealed at every seam.
- All barrier joints and penetrations (for wiring, vents) need to be taped or sealed airtight to stop moisture migration into wall cavities.
- Insulation between the vapor barrier and the exterior wall keeps heat inside the cabin instead of bleeding into adjacent bathroom fixtures.
- A short dry-out routine after each use, running the heater for 15 to 20 minutes with the door open, helps evaporate residual moisture from wood surfaces.
- Floor drainage matters more for steam-shower conversions than dry saunas, but even a dry sauna benefits from a floor material that won’t trap standing water.
This kind of placement planning is where most bathroom sauna failures actually originate, not in the heater choice. For exhaust and intake sizing specifics, this sauna ventilation guide walks through the math.
What Materials Should You Use for a Bathroom Sauna?
Interior wood choice affects both comfort and safety, since the wood surrounding the heater will get hot enough to matter. Aspen, alder, and cedar are the standard choices because they stay cooler to the touch than denser hardwoods and don’t release sap or resin under heat. Avoid resinous softwoods like pine near the heater, and never use tile inside the sauna itself. Tile retains heat unevenly and can cause burns on contact.
Behind that paneling, insulation needs to hold a reasonable R-value, typically similar to standard wall insulation, paired with the vapor barrier discussed above. Skimping on insulation forces the heater to work harder and shortens its lifespan.
- Bench depth should run at least 24 inches for a seated position, closer to 27 inches if anyone plans to lie down.
- Leave at least 3 feet of clearance between the bench and the heater’s front face.
- Doors must swing outward, always, for emergency exit safety.
- Use tempered glass if the door includes a window, since standard glass can shatter under thermal stress.
- Door hardware should tolerate high humidity without corroding within a year or two.
If you’re weighing door options for the surrounding bathroom as well, this bathroom door guidance covers material choices that hold up in humid environments.
How Much Does It Cost to Add a Sauna to a Bathroom?
Budget realistically, and budget early. When a sauna is added during an existing bathroom remodel, the incremental cost typically lands in the $8,000 to $15,000 range, depending on room size and heater choice. That range assumes the remodel is already touching framing, electrical, and plumbing, which is exactly why timing matters so much.
- Hire an electrician first. They’ll size the circuit, install the disconnect, and confirm whether your panel has capacity for a new 240V run.
- Bring in a carpenter or sauna installer for framing, insulation, vapor barrier, and interior paneling work.
- Involve a plumber only if you’re modifying drains, which mainly applies to steam-shower conversions rather than dry sauna cabins.
- Check your local building department before work starts. New dedicated circuits almost always trigger an electrical permit, and structural changes to walls may require a separate inspection.
- Schedule inspections at the rough-in stage, not after paneling goes up, since inspectors need to see wiring and framing before it’s covered.
Planning the sauna at the very start of a remodel, rather than as an afterthought, is what actually controls cost. If the walls are already open for other work, adding the sauna’s wiring and insulation during that same phase avoids a second round of demolition and repair later.
Which Conversion Path Fits Your Bathroom Best?
Four realistic paths exist, and each one asks something different of your existing bathroom.
Replacing a bathtub with a compact cabin works well when the tub sits against an exterior wall with decent floor access. You’ll need a structural check to confirm the floor can support the cabin’s weight, plus attention to how the new threshold meets the existing tile line. Floor drainage isn’t usually required for a dry sauna, but leveling the subfloor often is.
Converting a shower into a steam sauna is the most involved path. It calls for complete waterproofing behind new wall surfaces, a properly sloped floor to the existing drain, a steam generator sized to the enclosure’s volume, built-in seating that tolerates constant moisture, and a fully sealed door to keep steam contained.
Prebuilt compact cabins fit best in bathrooms with at least one open wall and standard ceiling height, since most ship as modular panel kits designed for 4x4 or 4x6 footprints. They need floor protection underneath, typically a moisture-resistant mat or sealed subfloor, and clearance on all sides for assembly.
Portable and tent-style units make sense for renters, short-term living situations, or anyone testing whether a sauna habit will stick before investing in a permanent build.
- Bathtub swap: moderate construction, no drainage changes needed for dry heat
- Shower-to-steam: highest construction and waterproofing demand
- Prebuilt cabin: fastest install, needs an open wall and floor protection
- Portable: zero construction, lowest cost, limited durability
Is a Bathroom Sauna Safe, and How Do You Keep It Clean?
The health case for regular sauna use is genuinely encouraging, though it comes with real caveats. A systematic review of 40 clinical studies found supportive evidence linking frequent dry sauna use to cardiovascular benefits and reduced mortality risk in observational data, but the review also notes that randomized controlled trials remain limited. Treat the benefits as promising, not proven.
Session length matters more than most people expect. Cleveland Clinic guidance recommends starting with 5 to 10 minute sessions and building up to 15 to 20 minutes as tolerance improves, always with hydration before and after. Alcohol before a session is a bad idea, and anyone with a major cardiovascular condition should get medical clearance first.
- Pregnant women, people with uncontrolled blood pressure, and anyone with a history of fainting should use extreme caution or avoid saunas entirely.
- Wipe down benches and walls after every use to prevent moisture from settling into wood grain.
- Run the dry-out routine (heater on, door open) for 15 to 20 minutes after each session.
- Check corners and floor seams monthly for early signs of mold or mildew.
- Replace or reseal wood surfaces showing discoloration before it spreads to framing.
A quick number worth remembering: the same systematic review found the strongest associations between health benefits and frequent use, not occasional use, which is a good argument for building a sauna somewhere you’ll actually use it several times a week. For temperature ranges tied to specific benefits, see this sauna temperature guide.
What Should Be on Your Contractor Handoff Checklist?
Once you’ve settled on a layout, hand your contractor and electrician a checklist, not a verbal description. Precision here prevents costly change orders mid-project.
- Measured room volume in cubic feet (length times width times height)
- Recommended heater kW range based on that volume
- Breaker size and circuit voltage (typically 30 amp, 240V for 4.5 to 6 kW heaters)
- Disconnect switch location, within sight of the heater
- Control panel placement, mounted outside the sauna enclosure
- Vapor barrier and insulation specs staged before framing closes up
- Junction box locations confirmed before drywall or paneling goes on
Pro Tip: Take photos of the rough-in stage, wiring, vapor barrier, and framing, before paneling covers it up. If anything needs troubleshooting later, those photos save an electrician real time.
Sauna Heater Supply’s team routinely helps homeowners match heater output to room volume before a single wire gets pulled, which avoids the two most common sizing mistakes: underpowered heaters that never reach temperature, and oversized units that waste energy in a small footprint. For the full installation sequence, this heater installation guide walks through each stage in order.
Is a Bathroom Sauna Worth the Investment?
Homeowners who add a sauna to an existing bathroom usually aren’t chasing a trend. They want a wellness habit that fits into a daily routine without a separate trip to a gym or spa, and a master bath already has the plumbing and electrical infrastructure closest to what a sauna needs. That proximity is the real appeal.
The tradeoff is moisture vigilance. A sauna you neglect for ventilation becomes a maintenance headache within a year. My honest advice: size up slightly whenever your floor plan allows it. A 4x6 room feels noticeably more livable than a 4x4, and the incremental material cost rarely matches the jump in comfort.
— Teddy
How Sauna Heater Supply Helps You Move From Planning to Purchase
Once you’ve measured your footprint and confirmed your electrician can support the circuit, the next question is which heater or cabin actually fits. Expert guidance curates that decision instead of leaving you to guess between dozens of specs.
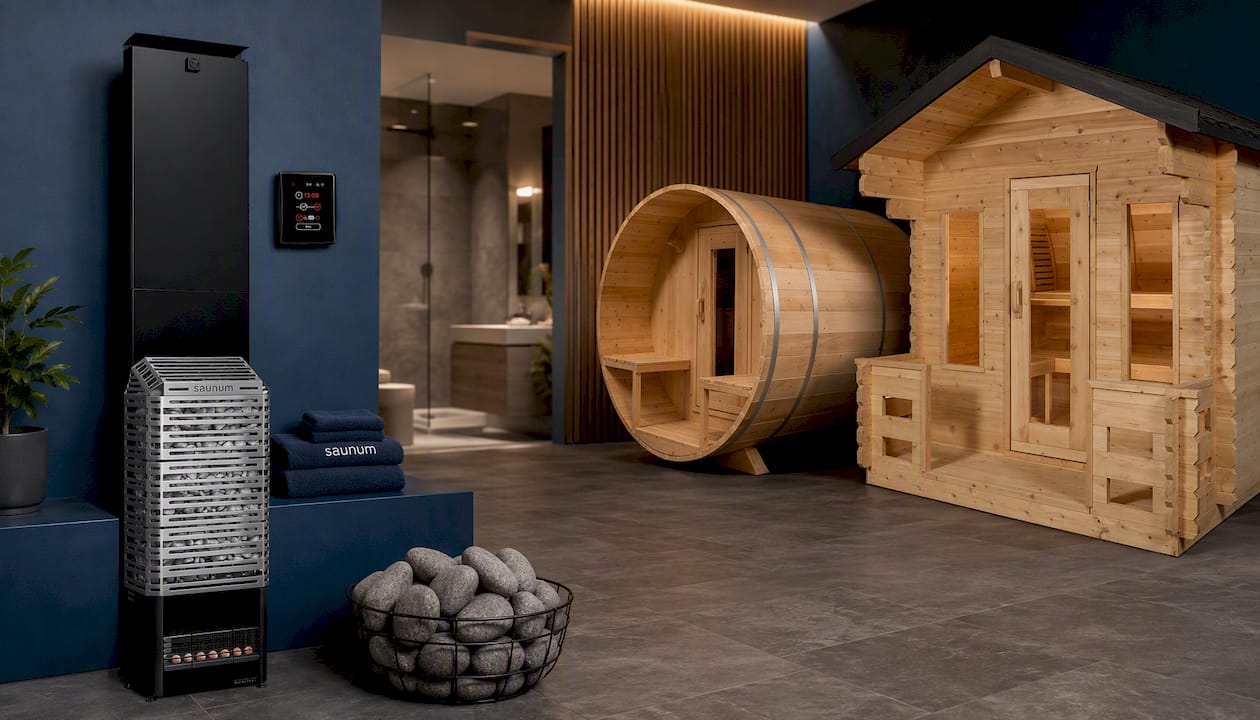
For a compact bathroom footprint in the 4x4 to 4x6 range, the Saunum Air 7 Sauna Heater Package is built around exactly the kind of small-room heat distribution this article has been describing, matched to the kW ranges covered above. If your remodel has room to spare and you’re considering a larger attached space instead of squeezing into the existing bathroom shell, the Dundalk CT Serenity Barrel Sauna with Narvi NC 16 stove gives you a step up in capacity without the full complexity of a custom build. And for readers who decide a true in-bathroom install doesn’t make sense but still want a dedicated sauna nearby, the CT Georgian Cabin Sauna with Porch is a standalone option worth comparing against a bathroom retrofit.
Purchases through this channel typically include support to confirm heater sizing against your specific room volume before you order. Once your measurements and electrical plan are in hand, request a product recommendation to lock in the right heater the first time.
This article is general information, not a substitute for advice from a qualified doctor. Consult a qualified healthcare professional about your own circumstances before acting on anything here.
Sources
- Build a Sauna — Sauna Society
- Clinical effects of regular dry sauna bathing: a systematic review
- Bathroom Sauna: How to Add a Sauna to Your Bathroom Renovation — Tahoe Sauna Company
- Sauna benefits — Cleveland Clinic
FAQ
Can You Put a Sauna in Your Bathroom?
Yes, most bathrooms with at least 16 square feet of usable floor space and access to a 240V electrical circuit can accommodate a compact sauna, either as a built-in cabin or a steam-shower conversion.
Can I Replace My Bathtub With a Sauna in My Bathroom?
Yes, replacing a bathtub with a compact sauna cabin is a common conversion path, provided the floor can support the cabin’s weight and the new threshold aligns cleanly with existing tile.
How Much Does It Cost to Install a Sauna in a Bathroom?
Adding a sauna during a bathroom remodel typically runs $8,000 to $15,000 incrementally, depending on room size and heater choice, and planning it early in the remodel keeps costs closer to the lower end.
Can Bacteria Grow in a Dry Sauna?
Yes, if moisture isn’t managed. A dry sauna’s high heat limits bacterial growth during use, but residual humidity left in wood surfaces or corners after a session can support mold and mildew without a proper dry-out routine and ventilation.
Do Infrared Cabins Require the Same Electrical Work as Traditional Saunas?
No. Many infrared cabins run on a standard 120V, 20 amp household circuit, while traditional electric sauna heaters typically need a dedicated 240V circuit with a 30 amp breaker for common bathroom sizes.