















Homeowners' 3 Infrastructure Steps for Indoor Cold Plunge Installation
Yes, you can safely complete an indoor cold plunge installation, provided you address three things first: drainage, electrical safety, and humidity control. Most homes can support one with the right prep. The immediate next step is simple: check your space for a floor drain, confirm circuit availability, and call an electrician or structural engineer before you buy a tub.
TL;DR:
- Most homes can support an indoor cold plunge if they have a floor drain, a dedicated circuit, and proper humidity management; basements are ideal for these conditions.
- Selecting a tub and chiller that match your usage — a 1/4 to 1/3 horsepower chiller for occasional use or higher for multi-user households — is crucial to prevent over- or under-sizing.
- Waterproofing the floor and extending drainage at least three feet around the tub protect against water damage, with concrete slabs being the most stable surface for weight support.
- Ensuring the room has adequate dehumidification and ventilation, typically with a 30 to 50 pint per day dehumidifier, prevents moisture buildup and musty odors.
- Cost estimates vary from $2,000 to over $8,000, depending on existing infrastructure, with professional electrical, plumbing, and waterproofing work deemed essential for safety and long-term durability.
Table of Contents
- Indoor Cold Plunge Installation Checklist: What to Verify First
- Which Room Works Best for an Indoor Cold Plunge?
- Do You Need a Dedicated Circuit for a Cold Plunge?
- How Do You Drain and Fill an Indoor Cold Plunge?
- How Big a Chiller Do You Need for a Cold Plunge?
- What Waterproofing Do You Need Under an Indoor Cold Plunge?
- How Much Dehumidification Does a Cold Plunge Room Need?
- How Do You Keep Cold Plunge Water Clean?
- What Does an Indoor Cold Plunge Cost to Install?
- Getting the Right Equipment for Your Space
- Cold Plunge Tubs and Chillers Worth Considering
- Manuals and Guidance Worth Reading Before You Start
- What I’d Tell Any Homeowner Before They Buy a Tub
- Sources
- FAQ
Indoor Cold Plunge Installation Checklist: What to Verify First
Before you shop for a tub, walk the room with a checklist in hand. A five-minute inspection now saves you from a returned product or a flooded basement later.
- Floor type: concrete slab handles water and weight far better than plywood subfloor over joists.
- Drainage: is there an existing floor drain, sump pit, or laundry standpipe nearby?
- Circuit availability: does the electrical panel have room for a dedicated 120V or 240V circuit?
- Clearance: most tubs need 6 to 12 inches of side clearance and front access for chiller service.
- Access path: can the tub and chiller physically fit through doorways and stairwells?
- Load concerns: is the room above grade, and does the floor system look capable of supporting a filled tub?
If you check “no” on drainage or load-bearing, stop and bring in a plumber or structural engineer before ordering equipment. Everything downstream, from chiller sizing to waterproofing, depends on getting these basics right.
Which Room Works Best for an Indoor Cold Plunge?
Basements win most placement debates, and for good reason. Concrete slabs handle water weight without complaint, ambient temperatures stay cooler year round (which helps your chiller work less), and any splashing stays contained to a space you’re not walking through in socks. The catch: verify there’s a drain nearby, and if the basement is below grade, get a waterproofing assessment before you commit to a spot.
Garages seem convenient, but they swing wildly in temperature. A garage that hits 95°F in July forces your chiller to work overtime, and chillers lose efficiency once ambient air climbs above 90°F. Insulating the space or adding a window unit narrows that gap.
Master bathrooms offer plumbing access but little else. Space is tight, water damage risk to finished flooring below is real, and the plunge, shower, and vanity all compete for footprint. Mudrooms split the difference between garage and finished space.
- Basements: best drainage and temperature stability, weakest natural light.
- Garages: easiest floor drain access, worst temperature control.
- Master baths: plumbing is already there, but space and waterproofing are tight.
- Mudrooms: moderate on all counts, good for retrofit projects.
Pro Tip: Walk the room at the hottest point of the day in summer and the coldest point in winter before finalizing placement. A 15 degree swing in ambient temperature changes your chiller math more than most homeowners expect.
Do You Need a Dedicated Circuit for a Cold Plunge?
Most residential chillers run on standard household voltage, but higher-output units often require dedicated higher-voltage service. Either way, plan for a dedicated circuit rather than sharing an outlet with other appliances. Startup current on compressor-driven chillers spikes higher than running current, and a shared circuit will trip under that load.
Work through this checklist with your electrician:
- Confirm the chiller’s voltage requirement (120V or 240V) from the product manual before running any wire.
- Install a dedicated circuit sized to the unit’s startup amperage, not just its running amperage.
- Use a GFCI-protected outlet or breaker. This isn’t optional near standing water, and it mirrors the same hydromassage-equipment protection required for hot tubs and spas under most local electrical codes.
- Locate the outlet where the cord reaches the chiller without stretching across a wet floor path.
- Ask about panel capacity. Older homes with 100-amp service sometimes need a panel upgrade to add a 240V line.
Budget for an electrician visit in the low hundreds for a simple dedicated 120V run, more if panel work or 240V service is involved. This is one line item worth paying a professional for. A licensed electrician will also flag whether your existing panel supports future additions, like a sauna heater on the same subpanel. Our electrical requirements guide covers load calculations in more detail.
How Do You Drain and Fill an Indoor Cold Plunge?
Every indoor plunge needs two things sorted before delivery day: a reliable fill source and a plan for getting water out. The four common approaches each fit different rooms.
- Floor drain tie-in: the simplest option if your basement or garage already has one; gravity does the work.
- Sump pump or ejector pump: necessary when there’s no gravity drain, pumping water up and out to a drain line or exterior discharge.
- Through-wall pump-out: a portable pump pushes water through a hose to an exterior grade or nearby drain, useful for finished rooms without plumbing.
- Laundry standpipe connection: convenient if a laundry room sits nearby, though check local code on backflow protection.
Full water changes usually happen at intervals of weeks to months depending on sanitation and usage, so drainage systems should handle occasional large volumes, not continuous flow. Add a water-sensor alarm near the base of the tub regardless of which drainage method you choose. A $20 leak detector is cheap insurance against a slow overflow ruining a finished floor overnight.
How Big a Chiller Do You Need for a Cold Plunge?
Chiller sizing depends almost entirely on how often the tub gets used and by how many people. Undersizing is the single most common mistake in DIY builds, according to practical build comparisons of chest-freezer conversions and stock-tank setups.
- Occasional single user: a 1/4 horsepower chiller usually keeps pace.
- Daily single user: step up to 1/3 horsepower for consistent recovery time between sessions.
- Multi-user household: 1/2 horsepower handles back-to-back sessions without long recovery gaps.
- Small commercial or heavy multi-user demand: 3/4 to 1 horsepower territory.
Integrated chiller tubs bundle the pump and cooling unit into the tub itself, which simplifies installation and keeps footprint smaller. Standalone chillers, like the Coldture Water Chiller, give you more flexibility to upgrade capacity later without replacing the whole tub. Whichever route you choose, leave at least 12 inches of clearance around the chiller for airflow and service access, and place it somewhere the compressor hum won’t compete with the point of the plunge, which is calm.
What Waterproofing Do You Need Under an Indoor Cold Plunge?
Water finds gaps you didn’t know existed, so treat the floor beneath and around your tub as its own project. Sealed concrete, tile with a waterproof membrane underneath, or epoxy coating all hold up to splash and standing moisture. Carpet, laminate, and unsealed hardwood do not belong anywhere near the tub’s exit zone.
- Install a waterproof membrane under tile or stone, not just a sealant on top.
- Extend waterproofing at least 3 feet beyond the tub’s footprint to cover splash and drip-off from exiting.
- Slope any exposed flooring slightly toward a drain rather than leaving it flat.
- Skip porous grout lines right at the exit point; solid surface or epoxy grout resists water intrusion better.
Water weighs roughly 8.3 pounds per gallon, so a 200-gallon plunge tub carries over 1,600 pounds before you factor in the tub itself and the person inside it. That load matters most on upper floors or over unsupported spans. If your installation sits anywhere other than a slab-on-grade basement, basement plunge pool guidance recommends a structural engineer review the floor system before you fill anything.
How Much Dehumidification Does a Cold Plunge Room Need?
Cold water sitting in a warm room generates condensation fast, and that moisture has nowhere good to go without help. A small dedicated room, roughly 100 to 150 square feet, typically needs a dehumidifier rated for 30 to 50 pints per day. Larger or shared spaces need proportionally more capacity or a ducted solution tied into your HVAC system.
- Size the exhaust fan for the room’s cubic footage, aiming for a full air exchange every 15 to 20 minutes.
- Use a humidistat to trigger the fan and dehumidifier automatically rather than relying on manual switches.
- Run the exhaust fan on a timer for at least 30 minutes after each session to clear residual humidity.
- Duct exhaust to the exterior, never into an attic or adjacent room, to avoid pushing the moisture problem elsewhere.
Pro Tip: Skipping humidity control is one of the most common regrets among homeowners who install indoor plunges, often ranking above chiller performance as a source of frustration. A musty basement odor months after installation generally indicates insufficient ventilation rather than issues with the tub itself. If you’re pairing the plunge with a sauna for contrast therapy, our cold plunge with sauna guide covers the added humidity load that combination creates.
How Do You Keep Cold Plunge Water Clean?
Chlorine-based sanitation works fine in warm pools, but cold water slows chemical reactions and makes dosing unpredictable. Ozone and UV-C inline systems have become the preferred approach for home cold plunges because they sanitize without relying on temperature-sensitive chemistry. Hydrogen peroxide dosing is a reasonable secondary option for owners who want a simpler, low-maintenance system.
- Run water through a filter loop daily, even on days the tub isn’t used, to prevent stagnation.
- Test water clarity and pH weekly with a basic pool test kit.
- Plan a full water change every few weeks depending on usage frequency and sanitation method.
- Drain and dry the system fully before any extended period of disuse, including winter storage if the plunge sits in an unheated space.
Our filtration and sanitizer matching guide walks through pairing specific filter and sanitizer combinations to tub size, which matters more than most owners expect once you’re running a system daily rather than occasionally.
What Does an Indoor Cold Plunge Cost to Install?
Costs scale with how much of the infrastructure already exists in your space. A basement with an existing drain and nearby electrical panel costs far less to convert than a finished bathroom needing new plumbing and structural review.
- Entry-level setup: $2,000 to $4,000, covering a basic tub, a small chiller, and minimal electrical work where a circuit already exists.
- Mid-range setup: $4,000 to $8,000, adding a properly sized chiller, dedicated circuit installation, and basic waterproofing.
- Premium setup: $8,000 and up, including structural review, full waterproofing, ventilation upgrades, and a higher-capacity chiller for multi-user households.
Contractor costs typically break down as an electrician for circuit work, a plumber if new drainage is needed, and finish carpentry or tile work for waterproofing. Complex basement builds with full engineering review can run 8 to 16 weeks from planning to commissioning, while a simpler retrofit into an existing drained space can finish in a couple of weeks. Check with your local building department on permit requirements before starting electrical or plumbing work, since requirements vary by jurisdiction and project scope.
Getting the Right Equipment for Your Space
Getting the infrastructure right is half the project. Choosing equipment that matches your household’s actual usage is the other half, and it’s where Saunaheatersupply’s product curation earns its keep. We match tub size, chiller capacity, and accessory needs to your specific room rather than pointing you toward whatever’s popular.
For a single daily user in a converted basement corner, a compact tub paired with a 1/3 horsepower chiller covers most needs without overspending on capacity you won’t use. Multi-user households benefit from stepping up chiller output and choosing a tub with enough water volume to avoid rapid temperature rebound between sessions. Our sizing guide and temperature planning resource help you land on the right combination before you order anything, backed by fast shipping and a price match guarantee if you find a better deal elsewhere.
Cold Plunge Tubs and Chillers Worth Considering
The Dundalk LeisureCraft Polar Plunge Tub fits homeowners retrofitting a basement corner or mudroom who want a proven tub without custom carpentry. It handles single or occasional dual use well and pairs easily with a mid-range chiller.
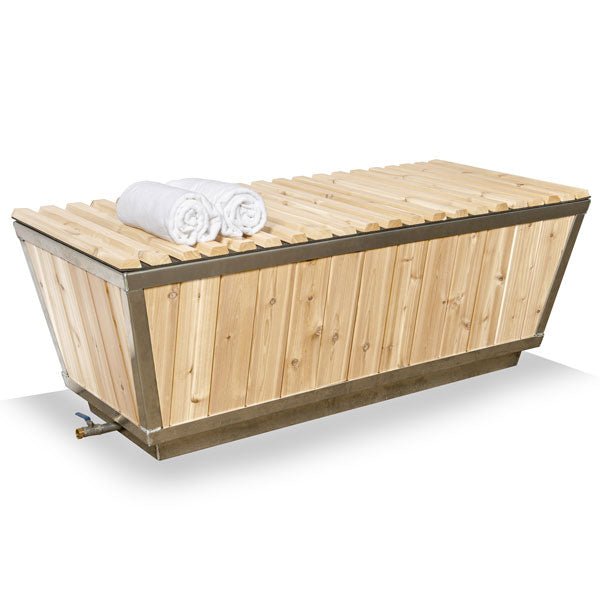
The Coldture Water Chiller works as a standalone unit for anyone who wants chiller flexibility separate from tub choice, particularly useful if you’re planning to size up capacity down the road without replacing the whole system.
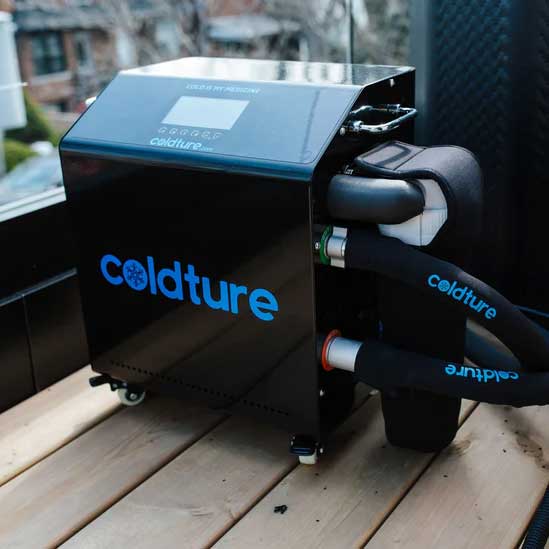
The Dundalk LeisureCraft Baltic Plunge Tub suits households planning a built-in installation or expecting multiple daily users, with construction built for that heavier duty cycle.
Support for orders includes product guidance matched to your room rather than generic catalog recommendations. If you’re unsure whether your space needs a 1/3 or 1/2 horsepower chiller, or whether the Polar or Baltic tub fits your footprint better, our team walks through your specific setup before you buy. We also offer Professional Sauna Installation and Custom Sauna Design Solutions for homeowners who want the electrical, plumbing, and placement work handled by experienced hands rather than pieced together solo. Browse our sauna collection and heater lineup if you’re planning a combined cold plunge and sauna build, and reach out for a consultation before you finalize your room layout.
Manuals and Guidance Worth Reading Before You Start
A few resources are worth reading in full before you finalize your plan.
- Manufacturer setup manuals, including Plunge’s residential setup guide, for unit-specific clearance and startup steps.
- Basement plunge pool engineering guidance for structural and waterproofing detail.
- Peer-reviewed context on cold exposure physiology, including a 2021 randomized trial and a systematic review of cold-water immersion, for readers curious about why the practice caught on.
What I’d Tell Any Homeowner Before They Buy a Tub
Infrastructure comes first, aesthetics come second. Nobody regrets the tile choice. People regret skipping a floor drain, undersizing the chiller for their actual usage, or ignoring humidity until the basement smells musty. Before you buy anything, do three things: confirm drainage, size the chiller to your real usage pattern, and plan ventilation like you mean it.
— Teddy
Sources
- PubMed: cold exposure study (PMID 35180666)
- PubMed: systematic review on cold water immersion (PMID 32028975)
- Swimmingandpool: Basement plunge pool ideas
- DIY Cold Plunge (Andrew Conner)
- Plunge support: setup guide for residential plunge
FAQ
Can You Put a Cold Plunge Indoors?
Yes, most homes can support an indoor cold plunge if you address drainage, a dedicated electrical circuit with GFCI protection, and humidity control before installation. Basements tend to work best due to concrete flooring and stable ambient temperatures.
How Do You Set Up a Cold Plunge at Home?
Start by checking your room for a floor drain or sump access, confirming electrical panel capacity, and verifying floor load capacity. From there, select a properly sized tub and chiller, waterproof the surrounding floor, and install ventilation before filling the tub for the first time.
How Cold Is Joe Rogan’s Cold Plunge?
Public commentary on his setup generally cites very cold water temperatures, colder than most home users need. Most homeowner setups run comfortably in a moderate cold range, which our temperature planning guide covers in detail.
What Happens After 30 Days of Cold Plunge?
Research on cold-water immersion points to measurable cardiovascular and autonomic responses with regular exposure, though results vary by individual and protocol, according to a systematic review of cold-water immersion studies. This is general context, not a personal health guarantee, and anyone with cardiovascular concerns should talk to a doctor before starting a regular practice.
Does Sauna Heater Supply Offer Installation Help?
Professional sauna installation and custom sauna design solutions are offered alongside product guidance for matching tubs and chillers to your space. Current pricing and consultation details are available directly on the Sauna Heater Supply site.