















Sauna Floor Drain Guide for Homeowners and Builders
A sauna floor drain is necessary when your hot room sees regular water use — traditional steam sessions, attached showers, or frequent hose-down cleaning — but it’s optional for small infrared cabins where perspiration is the only moisture source.
- Install a drain when: you throw water on stones, hose down the floor, or connect a shower to the hot room. Moisture accumulates faster than ventilation alone can handle, and without a drain you risk pooling, mold, and slip hazards.
- Skip the drain when: you run a compact infrared cabin used only for dry heat, with no water contact and good airflow. A waterproof floor with removable duckboards can manage the light perspiration load without full plumbing.
Two technical details matter regardless of which path you take: the floor must have a gentle slope toward the lowest point, and any drain assembly needs a P-trap to block sewer gases from entering the hot room. The Trevor Trowel Fill method is one of the most reliable builder techniques for achieving that slope without a full slab replacement.
Key Takeaways
A sauna floor drain is the right default choice for any traditional, wet, or commercial hot room — and the slope, substrate, and membrane must be planned before framing, not after.
| Point | Details |
|---|---|
| Drain is required for wet use | Any sauna with a shower, regular löyly, or hose-down cleaning needs a floor drain. |
| Minimum slope of 1/4" per foot | The floor must pitch consistently toward the drain to prevent pooling and standing water. |
| Non-organic substrate only | Use cement board or concrete under sauna finishes — never plywood or OSB directly beneath the hot room. |
| Waterproof membrane is non-negotiable | Integrate the membrane with the drain flange using the manufacturer’s bonding system before tiling. |
| Check local plumbing codes | Commercial installs and new drain tie-ins typically require a permit and a licensed plumber for trap work. |
| Saunaheatersupply for heaters and build support | Saunaheatersupply offers expert-curated heaters and consultation to match your room size and drainage design. |
Table of Contents
- When a sauna floor drain is required, recommended, or optional
- Drain and floor-system options for your sauna
- How to pitch the floor and which construction methods work best
- Waterproofing layers and floor finishes that work in a sauna
- Where to place drains and how many you need
- Step-by-step installation checklist for a drained sauna floor
- How to maintain a drained sauna floor and keep it sanitary
- Estimated costs and how long drain work usually takes
- Quick decision checklist: drain vs. no drain
- Pro builder tips and common mistakes to avoid
- The case for always defaulting to “yes”
- Saunaheatersupply has the heaters and expertise to complete your build
- Sources
When a sauna floor drain is required, recommended, or optional
The decision breaks down cleanly into three tiers.
Required or strongly expected:
- Commercial saunas, gym facilities, and spa installations almost always fall under local plumbing codes that mandate floor drains in wet rooms. Check with your local building department before framing.
- Any sauna with an attached or interior shower needs a drain. The water volume from a showerhead overwhelms any passive drainage strategy.
- High-traffic residential saunas used daily by multiple people, where hose-down cleaning is the practical sanitation method.
Recommended:
- Traditional Finnish-style saunas where you regularly ladle water onto the stones. Even modest löyly sessions add meaningful moisture to the floor.
- Outdoor barrel saunas exposed to rain ingress or condensation from temperature swings. The Finnmark Thermo-Aspen Combination Barrel Sauna FD-7 and the Finnmark Cedar Combination Barrel Sauna FD-6 are examples of barrel designs where floor drainage planning pays off long-term.
- Any sauna where children use the space — water play is predictable, and a drain makes cleanup straightforward.
Optional:
- Small infrared cabins (typically two-person units) used exclusively for dry heat. HomeSauna notes that a drain may be skipped here if the floor is properly waterproofed and ventilation is adequate.
- Rarely used home saunas with sealed concrete or tile floors and no water contact beyond light perspiration.
Builder consensus: Many experienced sauna builders say the safest default answer is “yes, install the drain.” The cost of adding a drain during construction is modest. The cost of retrofitting one after the fact — cutting the subfloor, re-sloping, re-waterproofing — can run several times higher. If you are on the fence, plan for the drain.
For commercial installations specifically, most jurisdictions treat a sauna with a shower or wet-room function the same as any other wet commercial space. That means licensed plumbing permits, inspected trap installations, and sometimes specific grate materials. Residential permits vary widely; some municipalities require a permit for any new drain tie-in, others do not. Confirm with your local authority before you break ground.
Drain and floor-system options for your sauna
Not every drainage solution requires cutting into your plumbing stack. Here are the main options, from full drain installations to passive alternatives.
Center floor drain: The most common choice for new builds. A single point drain sits at the geometric center of the room, and the floor slopes toward it from all four walls. Clean, simple, and easy to access for maintenance. Works best in square or near-square rooms.
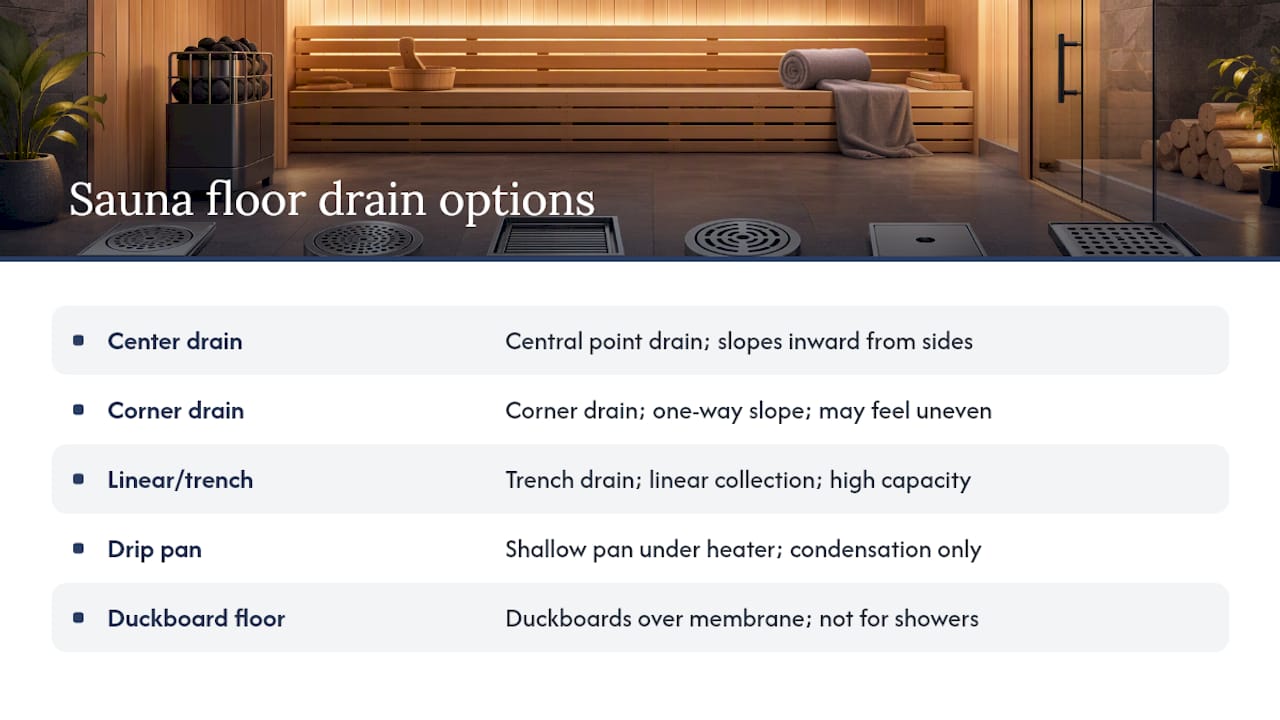
Corner drain: Placed at the lowest corner of a sloped floor. Easier to plumb in some layouts because it can be closer to an existing drain line. The tradeoff is that a single-direction slope can feel uneven underfoot if the pitch is aggressive.
Linear or trench drain: A trench drain runs along one wall or across the room’s width, collecting water along its entire length rather than at a single point. This works well in elongated rooms, combination steam/shower spaces, or anywhere a point drain would require an awkward multi-directional slope. Installation is more involved, but the collection capacity is higher.
Drip pan under the heater: A shallow stainless steel or galvanized pan placed directly beneath the heater catches condensation and minor drips. This is not a substitute for a floor drain in a wet sauna, but it protects the subfloor in a dry infrared setup where the heater is the only moisture source.
Waterproof floor with removable duckboards: For infrared or lightly used saunas, a properly waterproofed subfloor (cement board plus membrane) topped with raised cedar or thermally modified wood duckboards handles perspiration without any plumbing. Water sits on the waterproof layer and evaporates between sessions. Raised duckboards with ventilated undersides allow airflow beneath the slats, which speeds drying and reduces the risk of subfloor moisture buildup.
The duckboard-only approach has real limits: it cannot handle shower water, hose-down cleaning, or heavy löyly sessions. If your use case ever expands, you will wish you had installed the drain at build time.
How to pitch the floor and which construction methods work best
Slope is the foundation of any functional sauna drainage system. The floor must fall consistently toward the drain so water moves on its own rather than pooling. HomeSaunaLab recommends a minimum slope of 1/4 inch per foot, which translates to roughly a 2% grade. Most builders target a gentle slope as the practical range: enough to shed water reliably without making the floor feel noticeably tilted underfoot.
Three construction methods give you that slope without a full concrete pour.
Trevor Trowel Fill: Documented in detail at SaunaTimes, this approach uses cement board run up the wall as a guide, with premium-grade cement troweled between sleeper guides to build the slope. A skim coat over the cement board creates a water-tight, smooth substrate ready for tile or a waterproof membrane. It is favored for retrofits because it does not require removing the existing subfloor entirely.
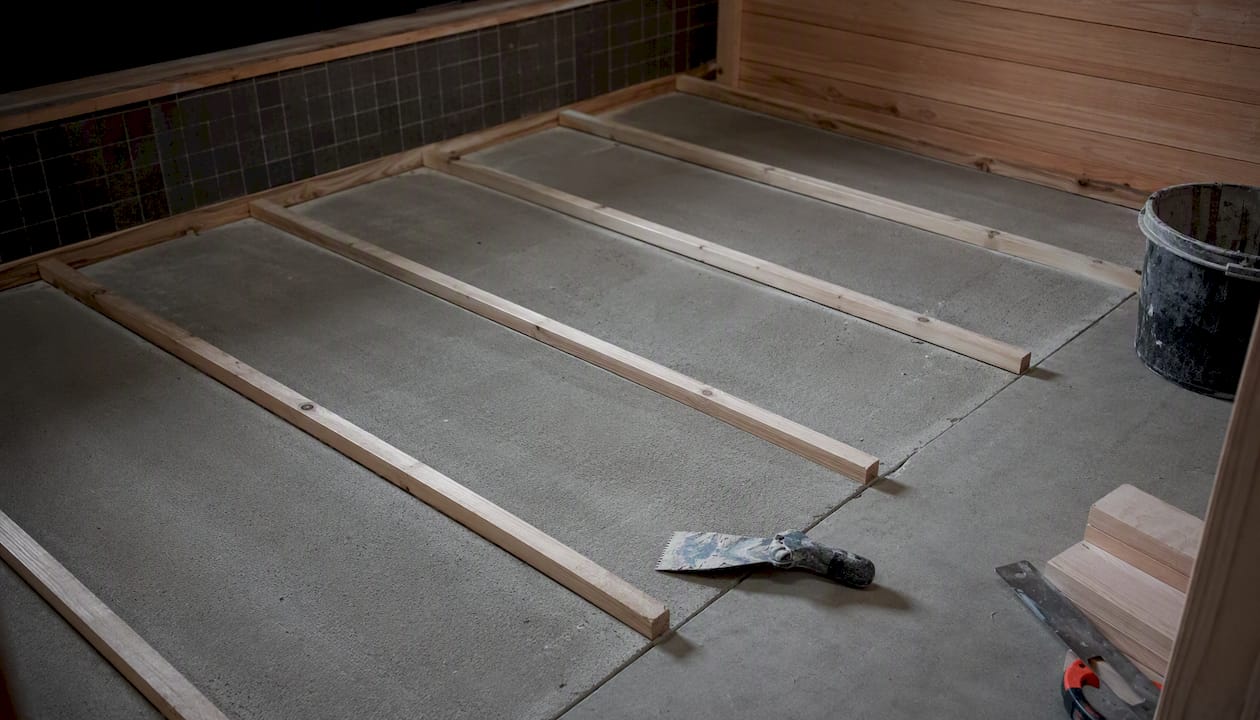
Bicycle-spoke method: Sleepers radiate outward from the drain location like spokes on a wheel. Each sleeper is set at the correct height to produce the target slope, then cement board spans between them. The spoke pattern works especially well for center drains in square rooms because every sleeper naturally points toward the low point.
Ben Square method: Sleepers run in a grid pattern, set at graduated heights to produce a consistent slope across the field. More material than the bicycle-spoke approach, but easier to execute for builders who prefer straight reference lines over radial geometry.
Pro Tip: Set your sleeper heights before any cement work begins. A laser level or a long straightedge with a digital angle finder will confirm your slope is consistent across the entire floor. Correcting an uneven slope after the cement board is down means starting over.
Here is the core build sequence regardless of which sleeper method you choose:
- Confirm the drain location and verify the tie-in point to your existing plumbing stack.
- Cut the subfloor opening for the drain body and P-trap assembly.
- Set sleepers at graduated heights to achieve the target slope (minimum 1/4 inch per foot).
- Install cement board over the sleepers, running it up the wall base by at least 2 inches.
- Apply a waterproof membrane over the cement board, lapping it up the wall and over the drain flange.
- Skim coat with vinyl cement or a compatible leveling compound to smooth the surface.
- Install the finish layer (tile, sealed concrete, or textured stone) and set the drain grate.
- Flood test before installing duckboards or any finish trim.
A licensed plumber should handle the drain tie-in and P-trap installation. The trap seal is what keeps sewer gas out of your hot room, and an improperly seated trap is both a code violation and a health issue.
Waterproofing layers and floor finishes that work in a sauna
The floor of a traditional sauna is one of the most demanding surfaces in any residential building. It cycles between high heat, steam, and cold water, sometimes multiple times per day. The layered system that survives this is not complicated, but every layer has to be right.
Tahoe Sauna Company advises using non-organic substrates under sauna finishes. Organic materials — plywood, OSB, standard wood subfloor — absorb moisture, deteriorate under repeated heat-and-wet cycles, and create conditions for mold growth. The correct substrate is cement board or poured concrete.
The recommended layer stack, from bottom to top:
- Subfloor: Existing joists or slab, structurally sound and level enough to accept the slope build-up.
- Cement board: 1/2-inch or 5/8-inch fiber cement board, fastened with corrosion-resistant screws, seams taped with alkaline-resistant mesh tape.
- Waterproof membrane: A sheet membrane (such as Schluter Kerdi) or a liquid-applied membrane (RedGard, Laticrete Hydro Ban) applied over the cement board and lapped up the wall at least 6 inches. The membrane must cover the drain flange and integrate with the drain’s clamping ring.
- Finish layer: Textured porcelain tile, natural stone, or sealed concrete. Smooth tile is a slip hazard when wet; specify a tile with a coefficient of friction (COF) rating of 0.60 or higher for wet areas.
- Duckboard overlay: Removable cedar or thermally modified wood slats raised on feet. HomeSauna recommends thermally modified wood for its dimensional stability and resistance to the repeated wet-dry cycles a sauna floor sees.
Pro Tip: Cedar duckboards with ventilated bases — at least 1/2 inch of clearance underneath — allow the waterproof layer below to dry between sessions. Remove and stand them on edge after each use if the sauna sees daily traffic. This single habit extends the life of both the duckboards and the membrane beneath them.
Avoid placing any organic material directly against the hot-room finish. That means no rubber-backed mats, no standard bath mats, and no untreated wood sitting flat on a wet tile surface. Trapped moisture under a non-breathable layer is where subfloor rot starts.
Where to place drains and how many you need
Drain placement is not just a plumbing question — it affects slope direction, bench layout, and long-term cleaning access. Getting it right at the planning stage saves significant rework.
Placement rules:
- Place the drain at the lowest point of the finished floor. This sounds obvious, but it means the slope direction must be decided before framing, not after.
- Keep the drain at least 6 inches from any wall to allow the grate to be removed and cleaned without obstruction.
- Avoid placing the drain directly under a bench. Debris and soap residue accumulate under benches, and a drain that is hard to reach will not get cleaned.
- Locate the drain as close as practical to the existing plumbing stack to minimize horizontal drain run length. Long horizontal runs increase the risk of slow drainage and require careful slope maintenance in the pipe itself.
Single vs. multiple drains:
- Rooms up to roughly 8 x 8 feet: a single center drain with a four-way slope handles the load cleanly.
- Rooms 8 x 12 feet or larger, or elongated footprints: consider two point drains or a single linear drain along the long wall. A single center drain in a long room requires an aggressive slope on the short axis that can feel uncomfortable underfoot.
- Combination sauna/shower rooms: the shower area typically gets its own drain, separate from the sauna floor drain, to handle the higher water volume.
Checklist before finalizing placement:
- Confirm slope direction works with bench layout (benches should not block drain access).
- Verify plumbing access from below (crawl space, basement, or open joist bay).
- Check that the drain grate can be removed with standard tools for routine cleaning.
- Confirm the P-trap location allows for inspection and cleaning access.
Step-by-step installation checklist for a drained sauna floor
This sequence covers a new build or a retrofit where the subfloor is accessible. For a retrofit, add a demolition phase before step one.
- Locate the plumbing tie-in. Identify the nearest drain stack or horizontal drain line. Confirm the tie-in point allows for the required slope in the drain pipe (minimum 1/4 inch per foot toward the stack).
- Select drain type and size. A 2-inch drain body handles most residential sauna loads. Commercial or shower-connected rooms may need a 3-inch body. Choose a grate material rated for the temperature range (stainless steel or brass; avoid chrome-plated zinc in high-heat environments).
- Mark and cut the subfloor opening. Cut the opening for the drain body and the P-trap assembly. The P-trap must be accessible for cleaning — plan an access panel if it will be enclosed.
- Set sleepers and level guides. Install sleepers at graduated heights using the bicycle-spoke, Ben Square, or Trevor Trowel Fill method. Verify slope with a level before proceeding.
- Install cement board. Fasten cement board over the sleepers, running it up the wall base. Tape all seams.
- Apply waterproof membrane. Cover the entire floor and wall base with a sheet or liquid membrane. Integrate the membrane with the drain flange using the manufacturer’s clamping ring or bonding flange system.
- Set the drain assembly and connect the P-trap. Have a licensed plumber complete the drain tie-in and trap installation at this stage.
- Skim coat and finish. Apply vinyl cement or a leveling compound over the membrane if needed for tile adhesion. Set tile or finish layer with a polymer-modified thinset rated for wet, high-temperature environments.
- Install the drain grate. Set the grate at or just below the finished floor surface so water flows in rather than over it.
- Flood test. Plug the drain, fill the floor area with 1–2 inches of water, and let it sit for 24 hours. Check the subfloor below for any moisture. Only proceed to duckboard installation after a clean flood test.
Before calling the job done:
- Confirm the P-trap is filled with water (pour a quart down the drain after the flood test).
- Check that the grate is secure and flush.
- Verify the drain cover can be removed without tools or with a single flathead screwdriver.
How to maintain a drained sauna floor and keep it sanitary
A properly built drained floor is easy to maintain. The drain itself is the most common source of problems when it is neglected.
Routine maintenance:
- After each session, remove duckboards and stand them on edge to dry. This takes 30 seconds and prevents moisture from sitting on the tile surface.
- Hose down the tile floor weekly if the sauna sees regular use. A light rinse with warm water moves debris toward the drain and prevents biofilm buildup on grout lines.
- Clean the drain grate monthly. Remove it, rinse it under hot water, and scrub with a stiff brush. Soap residue and mineral deposits accumulate on the grate faster than anywhere else on the floor.
- Use a sauna-safe wood cleaner on duckboards every few weeks. Standard household cleaners can damage cedar and thermally modified wood finishes; a purpose-formulated product protects the wood while sanitizing it.
Troubleshooting common problems:
- Slow drainage: Usually a partial clog in the grate or the trap. Remove the grate, clear visible debris, and pour hot water through. If the problem persists, the horizontal drain run may have a low spot — a licensed plumber can camera-inspect the line.
- Odors: The most common cause is a dry P-trap. If the sauna sits unused for two or more weeks, the trap water evaporates and sewer gas enters the room. Pour a quart of water down the drain before each use period. A persistent odor after the trap is refilled points to biofilm in the drain body — clean with an enzyme-based drain cleaner safe for PVC or ABS pipe.
- Standing moisture under duckboards: Either the slope is insufficient, the drain is partially blocked, or the duckboards are sitting flat without ventilation clearance. Confirm the drain is clear first, then check that the duckboard feet are intact and providing at least 1/2 inch of clearance.
Long-term care:
- Inspect the waterproof membrane at the wall-floor junction every two to three years. Grout cracks and membrane separation at this joint are the most common entry points for subfloor moisture.
- Replace duckboards when the wood shows persistent dark staining or soft spots. Thermally modified wood lasts longer than standard cedar in wet conditions, but no wood is indefinite.
Estimated costs and how long drain work usually takes
Cost ranges for sauna floor drain work vary significantly based on substrate condition, drain type, local labor rates, and whether the job is a new build or a retrofit.
Rough cost ranges:
- Materials only (DIY, new build): Drain body, cement board, membrane, tile, and duckboards typically run $400–$900 for a standard 6 x 8-foot room, depending on tile selection and membrane brand.
- Full retrofit with licensed plumber: Opening the subfloor, re-sloping, installing membrane and drain, tying into existing plumbing, and finishing can range from $1,500 to $4,000 or more depending on access difficulty and local plumber rates. Retrofits where the plumbing stack is far from the sauna location sit at the higher end.
- Linear or trench drain upgrade: Add $200–$600 in materials over a standard point drain, plus additional labor for the longer channel installation.
Typical timeline:
- Planning and material sourcing: 1–3 days.
- Demolition (retrofit only): 1 day.
- Sleeper setting, cement board, and membrane: 1–2 days.
- Membrane cure time: 24–48 hours minimum (liquid-applied membranes); sheet membranes can be tiled over sooner.
- Tile setting and grout cure: 24–72 hours before water exposure.
- Flood test: 24 hours.
- Total elapsed time from start to first use: typically 5–10 days for a retrofit, 3–7 days for a new build where the drain is planned from the start.
The single biggest driver of cost and timeline is whether drainage was planned at the framing stage. HomeSauna’s flooring guidance emphasizes this point: building slope and waterproofing into the original construction is far more efficient than cutting into a finished floor later. Get multiple local quotes for any work involving licensed plumbing — labor rates vary enough between markets that a single estimate can be misleading.
Quick decision checklist: drain vs. no drain
Work through these questions in order. A single “yes” in the first group means install the drain.
- Do you throw water on the stones during sessions? → Yes: install a drain.
- Is there a shower inside or directly attached to the sauna? → Yes: install a drain.
- Is this a commercial, gym, or spa installation? → Yes: install a drain (and check local code).
- Do you plan to hose down the floor for cleaning? → Yes: install a drain.
- Will multiple people use the sauna daily? → Yes: strongly recommended.
- Is the sauna an infrared-only cabin with no water contact? → No to all above: a waterproof floor with duckboards may be sufficient.
- Is the sauna used infrequently (weekly or less) with good ventilation? → No to all above: optional, but plan the waterproofing carefully.
If you answered “no” to questions 1–5 but “yes” to 6 or 7, a drain is optional. The borderline case — a traditional sauna used occasionally with no shower — is where a consultation with a licensed plumber or sauna designer pays for itself. The cost of the conversation is nothing compared to the cost of a subfloor replacement.
Pro builder tips and common mistakes to avoid
These are the insights that separate a floor that performs for 20 years from one that needs a retrofit in five.
- Plan slope at the framing stage. This is the single most repeated piece of advice from experienced builders. Once walls are up and benches are in, correcting an unsloped floor means tearing out the finish, the substrate, and sometimes the framing.
- Never use organic subfloor material directly under the hot-room finish. Plywood and OSB under tile or stone in a sauna will absorb moisture through any grout crack and begin deteriorating within a few seasons. Cement board or concrete only.
- Install an access panel for the P-trap. A trap you cannot reach is a trap you cannot clean or inspect. Build a removable panel into the wall or floor framing near the trap location.
- Use a drain body rated for high-temperature environments. Standard PVC drain bodies are rated to 140°F; sauna floors can exceed that near the heater. Specify a drain body rated for 180°F or higher, or use a cast iron or stainless steel body.
- Integrate the membrane with the drain flange, not just around it. The most common waterproofing failure point is the drain-to-membrane joint. Use the drain manufacturer’s bonding flange or clamping ring system, and follow the membrane manufacturer’s instructions for that specific integration.
- Slope the entire floor, not just the area near the drain. A common mistake is creating a small depression around the drain while leaving the rest of the floor flat. Water will pool at the transition. The slope must be consistent from wall to drain across the full floor area.
- Avoid placing the drain directly under a bench. Debris accumulates under benches and a drain that cannot be easily accessed will not get cleaned. Position the drain in open floor space.
- Test before you finish. A flood test after membrane installation but before tile is the cheapest insurance available. Finding a leak at that stage costs an afternoon. Finding it after the tile is set costs a full demo and rebuild.
Pro Tip: The Trevor Trowel Fill method is particularly well-suited for retrofits where the existing subfloor is structurally sound but unsloped. It avoids full demolition while giving you a reliable, water-tight substrate. Pair it with a quality sheet membrane and a drain body rated for sauna temperatures, and the result is a floor that performs as well as a new build.
Common retrofit regrets from builders: missing the slope entirely (floor drains but pools form at the walls), using a standard bath membrane that fails at sauna temperatures, and placing the P-trap in an inaccessible location. Each of these is a planning failure, not a materials failure.
The case for always defaulting to “yes”
Most of the debate around sauna floor drains comes down to upfront cost versus long-term risk. The builders who have done the most retrofits are the most consistent: they recommend installing the drain during the original build, even when the owner is certain they will only use the sauna for dry heat.
Use patterns change. A sauna built for dry infrared sessions often becomes a traditional steam sauna once the owner experiences löyly. Kids use the space. Guests use the space. The floor gets hosed down because it is the easiest way to clean it. Every one of these scenarios is better served by a drain that is already there.
The waterproof floor with duckboards is a legitimate solution for a genuinely dry, low-traffic infrared cabin. But it is not a hedge against future wet use. Once you start throwing water, you need the drain. And at that point, you are looking at a retrofit.
The Tahoe Sauna Company’s guidance on substrate and slope reflects the same principle: decisions made at the framing stage are cheap. Decisions corrected after the fact are expensive. Default to the drain, build the slope correctly, and the floor will handle whatever the sauna becomes.
Saunaheatersupply has the heaters and expertise to complete your build
Choosing the right heater is as consequential as the floor system beneath it. Saunaheatersupply carries a curated lineup of electric and wood-fired heaters matched to every room size and use case, from the Harvia Kip45W Heater Package with WiFi for mid-size traditional rooms to the IKI Pillar 9kW with WiFi controller for compact high-performance builds. The Saunum Air 7 Sauna Heater Package and the Saunum Air L 15 Package cover larger rooms where drainage planning and heater placement need to work together. For steam and combination setups, the iSteamX Steam Shower Control and Steamhead and the Temperature Probe for iSteam, AirTempo, iTempo, and iTempoPlus Controls integrate cleanly with wet-room floor designs.

Every order comes with expert guidance on matching heater output to room volume, placement relative to benches and drains, and accessory selection. Browse the full catalog at Saunaheatersupply or reach out directly for a product recommendation tailored to your build.
Sources
Verify local plumbing codes and permit requirements with your municipal building department before starting any drain tie-in work. Requirements vary by jurisdiction and by whether the installation is residential or commercial.
- How to Add a Floor Drain to a Sauna (Without a Full Remodel) - HomeSaunaLab
- What Are the Best Sauna Flooring Options in 2026? (Revealed) – HomeSauna
- Sauna Floor Options: Concrete, Tile, Cedar & Drainage | Tahoe Sauna Company
- Looking to pitch your sauna floor and install a drain? Consider the Trevor Trowel Fill Method - SaunaTimes
- Trench drain — Wikipedia
Recommended
- Sauna Heater Installation: Step-by-Step Guide for Homeowners — Sauna Heater Supply
- Basement Sauna Kit: Complete Buyer’s Installation Guide — Sauna Heater Supply
- Sauna Ceiling Height: Exact Measurements for Builders — Sauna Heater Supply
- Steam Room vs Sauna: What Homeowners & Contractors Should Choose — Sauna Heater Supply