















How to Calibrate a Sauna Hygrometer: Methods That Work
For most sauna synthetic-hair hygrometers, use the bucket-and-towel microclimate method and adjust the rear screw until the dial reads 100%. The saturated salt test, which produces a stable 75% relative humidity reference, is the standard baseline for most general-purpose digital hygrometers and takes 8 to 24 hours to settle.
Sauna hygrometer calibration does not need to be complicated, but it does need to match the tool you own. A wood-and-glass analog dial calibrates differently than a battery-powered digital sensor, and the wrong method can damage either one.
Here’s the quick version:
- Sauna-specific analog units (synthetic hair): bucket-and-towel method, 5 to 15 minutes, target 100% RH.
- General digital or reference hygrometers: saturated salt paste in a sealed container, 8 to 24 hours, target 75% RH.
- Acceptable tolerance: analog units typically run ±5–10%; digital units typically run ±1–5%.
- If a reading falls outside those bands after calibration, the unit likely needs replacement rather than another adjustment attempt.
Key Takeaways
Accurate sauna hygrometer calibration comes down to matching the method to the instrument: bucket-and-towel for synthetic-hair analogs, salt test for digital and reference units.
| Point | Details |
|---|---|
| Match method to device | Use bucket-and-towel (100% RH, 5–15 minutes) for sauna analog units; use salt test (75% RH, 8–24 hours) for digital units. |
| Know your tolerance band | Analog hygrometers typically run ±5–10% accuracy; digital units typically run ±1–5%. |
| Set a recalibration schedule | Check every 6–12 months for moderate use, every 3–4 months for daily sauna sessions. |
| Protect the mechanism | Never submerge a hygrometer or soak a wooden housing; remove batteries from digital units during long storage. |
| Upgrade for reliability | Sauna Heater Supply’s Hukka Maininki hygrometer and SaunaLife accessory sets are built to hold calibration through repeated heat cycling. |
Table of Contents
- What Is Sauna Hygrometer Calibration and Why Does It Drift?
- When Should You Recalibrate a Sauna Hygrometer?
- Salt Test vs. Bucket Method vs. Reference Hygrometer
- Step-by-Step: Calibrating a Sauna-Safe Analog Hygrometer
- How Do You Calibrate a Digital or Smart Sauna Hygrometer?
- How Do You Know the Calibration Actually Worked?
- How Do You Keep a Sauna Hygrometer Accurate Longer?
- Trusted Sauna Instruments Make Calibration Easier
- A Practical Note on Calibration Habits
- Get the Right Tools to Keep Your Sauna Readings Accurate
- Sources
What Is Sauna Hygrometer Calibration and Why Does It Drift?
Sauna hygrometer calibration is the process of adjusting a humidity gauge’s reading against a known reference point, so the number on the dial matches the actual moisture level in the air. Every hygrometer, analog or digital, drifts over time. Heat cycling, steam exposure, and simple mechanical wear all push the sensor away from its factory setting.
Analog sauna hygrometers use a bundle of synthetic hair (occasionally human hair in older units) that expands and contracts with humidity, pulling a needle across the dial. That mechanism is elegant but imprecise, and repeated heat exposure gradually changes how much the hair stretches. Digital hygrometers use a capacitive or resistive sensor chip, which is more stable but not immune to drift, especially in a moisture-heavy, high-heat environment like a sauna. Sensor datasheets from manufacturers such as Sensirion document exactly how much accuracy shifts over a sensor’s working life, which is why even “sealed” digital units benefit from a periodic check.
When Should You Recalibrate a Sauna Hygrometer?
Most sauna owners get away with checking their hygrometer every 6 to 12 months. If you’re running your sauna several times a week, tighten that to every 3 to 4 months, since frequent heat and steam cycling accelerates drift in the synthetic-hair mechanism.
Certain events should trigger an off-schedule check regardless of when you last calibrated:
- A period of unusually heavy steam use, like back-to-back sessions during a cold snap.
- Any physical shock, such as a dropped hygrometer or a bump during cleaning.
- Long storage, especially over winter in an unheated space.
- Readings that suddenly jump, stall, or disagree noticeably with how humid the room feels.
Not every check needs to be a full recalibration. A quick bucket-and-towel test takes 5 to 15 minutes and tells you whether the dial is roughly on target. A full salt-test calibration, which anchors the reading to a hard 75% RH reference, takes 8 to 24 hours and is worth reserving for twice-a-year maintenance or whenever the quick check reveals a real problem.
Salt Test vs. Bucket Method vs. Reference Hygrometer
Three calibration approaches cover almost every situation a sauna owner runs into, and each one solves a different problem.
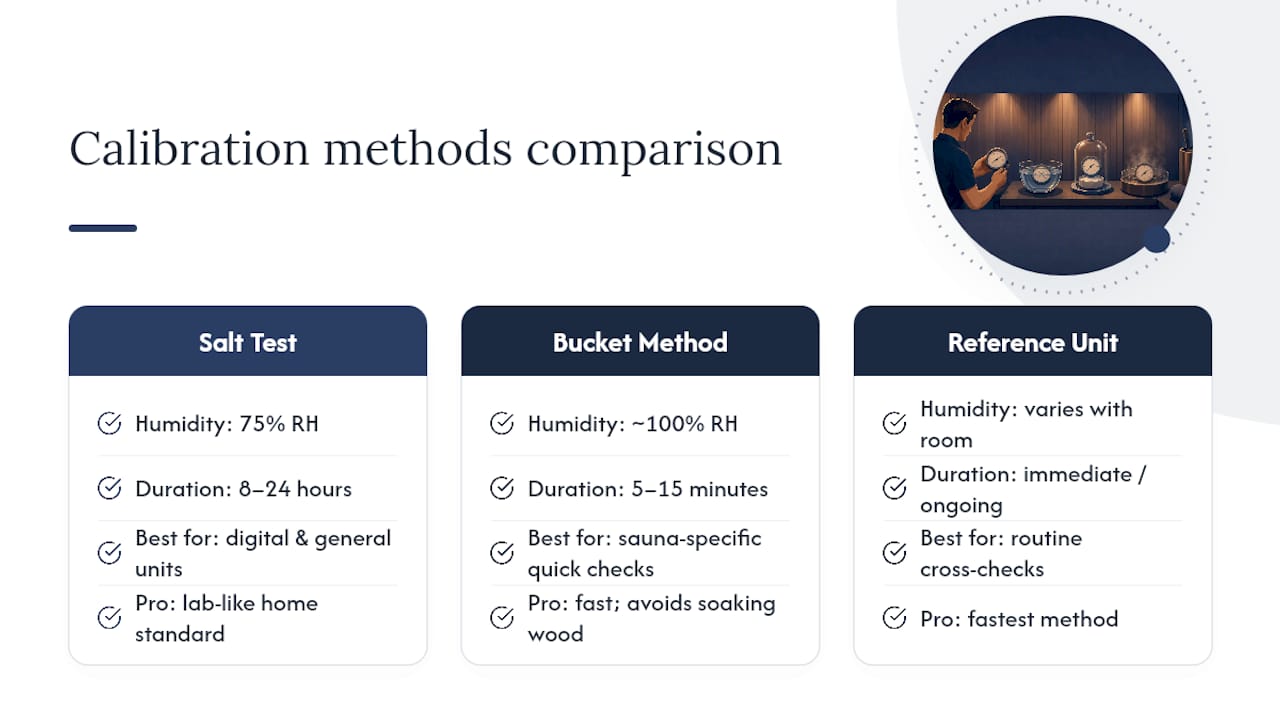
The saturated salt method is the closest thing to a laboratory standard available at home. Mix table salt with a small amount of water until it forms a wet paste, place it in a shallow cap or lid, and seal both the paste and your hygrometer inside an airtight container. The salt paste stabilizes the air inside at almost exactly 75% relative humidity, and after 8 to 24 hours your hygrometer’s reading should match that number. If it doesn’t, you adjust it until it does. This method suits digital units and general-purpose hygrometers that need a hard, defensible reference point, but it’s slow, and repeated exposure to salt residue isn’t ideal for wooden-framed sauna analogs.
The bucket-and-towel method is the sauna-specific shortcut. Fill a bucket with warm water, set your hygrometer face up on a rack or stand above the waterline (never touching the water), and drape a towel loosely over the top to trap the rising vapor. Within 5 to 15 minutes, the trapped microclimate reaches close to 100% RH, giving you a fast high-end reference to adjust against. This is the safest option for synthetic-hair analog hygrometers, since it avoids submerging the housing or exposing delicate wood trim to standing water.
A trusted reference hygrometer lets you cross-check readings without waiting on either test. Keep one calibrated digital unit as a known-good benchmark, and compare your sauna hygrometer’s reading against it in the same room, at the same time. This method is fast and ongoing, but it’s only as good as the reference device itself, so it works best as a supplement to periodic salt or bucket tests, not a replacement for them.
Pro Tip: Never run a salt test on a hygrometer built into a wooden housing without checking the manufacturer’s manual first. Some manufacturer calibration guides specifically warn against soaking or extended airtight exposure that can warp wood trim, and recommend the humid microclimate method instead.
Avoid running any digital hygrometer through direct steam exposure during calibration. Electronics and standing moisture don’t mix, even briefly, and repeated exposure shortens sensor life well before the accuracy drifts on its own.
Step-by-Step: Calibrating a Sauna-Safe Analog Hygrometer
You need a bucket, warm (not boiling) water, a towel, and a small screwdriver that fits the adjustment screw on the back of your hygrometer. Do not submerge the unit, and keep wooden housings away from standing water at every stage.
- Fill a bucket about a third full with warm water, ideally around 100 to 110°F.
- Set the hygrometer face up on a small stand or rack positioned above the waterline, never touching it.
- Drape a towel loosely over the bucket and hygrometer to trap the rising vapor without sealing it airtight.
- Wait 5 to 15 minutes for the trapped air to reach a stable, near-saturated microclimate.
- Read the dial without removing the hygrometer from under the towel.
- If the needle sits below 100%, use the small screwdriver to turn the rear adjustment screw slowly, in tiny increments.
- Re-cover and wait a few more minutes, then check again. Repeat until the dial reads 100% or holds a stable high reading.
Once the dial settles, remount the hygrometer in its normal spot in the sauna and give it one full heating cycle before trusting the reading again. Adjust in small steps rather than large turns to avoid overshooting the screw, which is a common error that requires restarting the process.
Pro Tip: If the needle won’t reach 100% no matter how long you wait or how far you turn the screw, the synthetic-hair element itself may have degraded past the point of adjustment, which usually means it’s time to replace the unit rather than keep chasing the calibration.
How Do You Calibrate a Digital or Smart Sauna Hygrometer?
Digital hygrometers calibrate differently than analog ones, and they’re generally easier to get right. Most consumer digital units land within ±1 to 5% accuracy once properly calibrated, well ahead of the ±5 to 10% typical of mechanical analog gauges.
- Run the same saturated salt test described above. Seal the digital unit with the salt paste for 8 to 24 hours, then compare the display to the expected 75% RH target.
- If the reading is off, use the device’s built-in calibration control, a rear-facing button or a companion app offset, rather than any physical adjustment screw.
- If the sensor won’t hold a calibration or drifts again within a few weeks, try a factory reset or a firmware update before assuming the hardware has failed.
- Mount digital units where they read representative sauna air, but shielded from direct steam blasts. A shelf or wall mount away from the heater vent works better than a spot right above the rocks.
How Do You Know the Calibration Actually Worked?
Run the same test a second time once you’re done adjusting, whether that’s a repeat bucket check or a second salt-test cycle, and log both readings side by side. A calibration that holds steady across two separate tests is one you can trust; a reading that drifts again within days points to a mechanical problem, not a one-time fluke.
Judge the result against realistic tolerance bands rather than perfection. Analog units commonly run ±5 to 10%, while digital sensors typically hold within ±1 to 5%. A multi-day logging comparison against a known reference is the most reliable way to catch slow drift that a single quick test would miss.
- If an analog unit won’t hold within roughly 10% after calibration, the synthetic-hair element has likely degraded past usable range.
- If a digital unit won’t hold within roughly 5%, check for moisture ingress around the sensor port before assuming the chip itself failed.
- Persistent drift after two or three calibration attempts usually means repair or replacement, not another adjustment.
Age, sustained moisture exposure, and general mechanical wear cause most drift. A five-year-old analog gauge that’s spent every winter in an unheated shed is a far better candidate for replacement than for another round of screwdriver adjustments.
How Do You Keep a Sauna Hygrometer Accurate Longer?
A few habits cut down how often you need a full recalibration. Run a quick visual check after any unusually intense session, and never let a hygrometer sit in direct water contact, even briefly, during cleaning. Pull batteries from digital units before long storage periods to avoid corrosion-related false readings.
- Heavy users (daily or near-daily sessions): quick check every 3 to 4 months.
- Moderate users (a few times a week): quick check every 6 months.
- Light or seasonal users: check before the season starts and again mid-season.
- Retire an analog hygrometer once it repeatedly won’t hold calibration rather than adjusting it every few weeks indefinitely.
Trusted Sauna Instruments Make Calibration Easier
The bucket-and-towel method works on nearly any synthetic-hair analog hygrometer, but the calibration process is smoother when the instrument itself is built for sauna conditions in the first place. Cheaper imported gauges sometimes use adjustment screws that strip or hair elements that don’t hold a setting past a few cycles, which turns a five-minute check into a recurring headache.
- The Hukka Maininki sauna thermometer and hygrometer pairs a readable dial with a housing built to handle repeated heat cycling without warping.
- The SaunaLife bucket, ladle, hygrometer, and thermometer set bundles the exact tools the bucket-and-towel method calls for, so you’re not scrambling for a spare bucket mid-check.
- Getting humidity readings right matters more once you understand the safe temperature ranges a sauna should hold, since temperature and humidity together determine how a session actually feels, a balance that varies across traditions, as seen in banya versus dry sauna heat practices.
A Practical Note on Calibration Habits
Most drift complaints trace back to the same mistake: someone lets a hygrometer sit for two or three years without a single check, then wonders why a session that feels brutally dry reads 60% on the dial. Recalibrating every 6 to 12 months, or every 3 to 4 months for daily users, catches drift before it becomes a trust problem.
Stick to the microclimate method for synthetic-hair analog units and the salt test for digital ones. Never submerge either, and never rush a wooden housing through a long airtight seal.
— Teddy
Get the Right Tools to Keep Your Sauna Readings Accurate
Calibration only gets you so far if the heater itself can’t maintain a stable microclimate for your hygrometer to measure. Saunaheatersupply carries the full range of instruments and heat sources that make accurate humidity tracking possible in the first place, not just the sensors, but the equipment that determines whether your sauna holds a consistent moisture level session after session.

A properly calibrated hygrometer paired with an underpowered or inconsistent heater still gives you unreliable sessions, which is why pairing your monitoring setup with dependable heat output matters just as much as the calibration itself. The Harvia Kip45W heater package and the IKI Pillar 9kW with wifi controller both offer the steady heat output that keeps humidity readings meaningful, while the SaunaLife Accessory Package 7 rounds out your setup with the bucket, ladle, and gauge tools calibration actually requires. Saunaheatersupply backs every order with expert product guidance and a price match guarantee, so you’re not left guessing which heater or hygrometer combination fits your space. Browse the full sauna heater and accessory catalog to find the right setup for your build, or call for personalized recommendations before you order.
Sources
- How to Calibrate Your Sauna Hygrometer with Synthetic Hair (Simple 5-Minute Method) | Sauna Assistant
- How to Calibrate a Hygrometer or Air Humidity Sensor?
- Using Hygrometers to Measure Humidity — Acurite support
- Datasheet_SHTC3.pdf — Sensirion