















Steam Generator Troubleshooting: Fix It Fast
Most steam generator problems come down to four things: no power reaching the unit, a closed or restricted water supply, a control or display error code, or scale buildup blocking the heating element. Check those four in order and you will resolve the majority of steam generator issues without calling a technician.
Run through this checklist before anything else:
- Power: Confirm the dedicated breaker is on and has not tripped. Check any GFCI device on the circuit.
- Water supply: Verify the shutoff valve feeding the generator is fully open. Look for a kinked or pinched supply line.
- Control/display: Note any error code on the wall control. Write it down before resetting.
- Reset: Power-cycle the unit at the breaker for 30 seconds, then restore power and call for steam from the wall control.
- Priming (tanked units): Confirm the water tank is filled to the marked line and seated correctly before powering on.
- Steam call: Verify the wall control is actually calling for steam, not just powered on.
Safety first: Steam generators operate on 240V circuits and produce pressurized steam above 212°F. Before opening any panel or touching internal components, shut off power at the breaker and allow the unit to cool for at least 30 minutes.
Pro Tip: If the wall control lights up but the generator never activates, disconnect the control cable at the generator end and use the unit’s onboard test button (where available) to call for steam directly. If the generator runs on the test button but not through the control, the fault is in the cable or wall control, not the generator itself.
Key Takeaways
Correct steam generator troubleshooting starts with power and water supply checks, then moves to control errors and sensor diagnostics before any component is replaced.
| Point | Details |
|---|---|
| Check power and water first | Most no-start faults trace to a tripped breaker, closed shutoff, or blocked inlet strainer. |
| Read the error code before resetting | Writing down the code before power-cycling preserves the diagnostic information you need. |
| Inspect the control cable before the board | Physical cable damage causes most persistent Err and H2O codes; replacing the cable is cheaper and faster than a board swap. |
| Descale annually (more often in hard water) | Scale buildup on the heating element is the leading cause of low-steam output and premature element failure. |
| Saunaheatersupply for OEM parts | Replacement controls, temperature probes, and steamheads are available with compatibility guidance to get the repair right the first time. |
Table of Contents
- Safety steps you must complete before opening the generator
- Immediate power and water checks that solve most “won’t start” problems
- Why your generator heats but produces little or no steam
- Control panel, display errors, and what each code usually means
- Strange noises, banging, or irregular operation
- Detecting and fixing leaks, overflowing, or water at the steamhead
- Safe electrical tests and sensor diagnostics for technicians
- How to descale, flush, and maintain your steam generator
- Installation and placement errors that shorten service life
- Printable on-site diagnostic flow
- When to stop and call a licensed technician
- Extended error codes beyond the standard display faults
- Troubleshooting thermostat problems in steam generators
- What years of steam equipment work actually teach you
- Get the right replacement parts without the guesswork
- Sources
Safety steps you must complete before opening the generator
Steam generator troubleshooting involves live 240V circuits and pressurized hot water. Skipping safety steps creates serious injury risk.
- Shut off the dedicated breaker and apply a lockout tag if other people are in the space.
- Verify zero voltage with a non-contact voltage tester at the generator’s terminal block before touching any wiring.
- Allow 30 minutes of cool-down after the last steam cycle. The tank, plumbing, and element can hold scalding temperatures long after the unit shuts off.
- Close the water supply shutoff before opening the generator cabinet or disconnecting any plumbing union.
- Drain the tank by opening the drain valve before removing elements or probes.
- Wear insulated gloves and safety glasses when working near plumbing connections or electrical terminals.
- Stop immediately and call a licensed electrician if you find scorched wiring, melted insulation, or a breaker that trips again after reset.
High-voltage troubleshooting on incoming service wiring, transformer replacement, and contactor replacement must be performed by a licensed electrician. Homeowners can safely perform visual inspections, control resets, descaling, and basic plumbing checks, but should not work on energized 240V terminals.
Pro Tip: Keep a flashlight and a non-contact voltage tester in your steam room utility kit. Both are inexpensive and eliminate the guesswork about whether a circuit is truly de-energized before you reach inside.
Immediate power and water checks that solve most “won’t start” problems
These are the highest-probability fixes, ordered by how often each cause appears in the field.
Electrical checks
- Check the main panel breaker. A tripped breaker sits between ON and OFF. Reset it fully to OFF, then back to ON. If it trips again immediately, stop and call an electrician.
- Check the branch breaker at any sub-panel feeding the steam room circuit.
- Test any GFCI device on the circuit. Press TEST, then RESET. A GFCI that trips repeatedly under load signals a ground fault in the wiring or generator.
- Verify supply voltage. Steam generators rated for 240V can underperform on a marginal 208–218V supply. Technicians should measure voltage at the generator’s terminal block with the unit de-energized and then confirm under load with a clamp meter. Readings below 208V on a 240V-rated unit will cause weak heating or no-start conditions. For electrical planning guidance specific to steam and sauna equipment, Saunaheatersupply’s installation resource covers wire gauge, breaker sizing, and voltage requirements in detail.
Water supply checks
- Confirm the cold-water shutoff valve is fully open, not just cracked.
- Inspect the inlet strainer or mesh screen at the generator’s water inlet. Scale and debris collect here and restrict flow enough to trigger low-water errors.
- Verify water pressure is within the manufacturer’s specified range (typically 20–80 PSI for most residential units).
- For tanked consumer models, fill the tank to the marked line, seat it firmly, and allow the unit to prime before calling for steam.
Pro Tip: To isolate whether the wall control or the control cable is at fault, disconnect the cable at the generator end and jumper the appropriate terminals per your model’s wiring diagram to simulate a steam call. If the generator fires, the cable or control is the problem. The Inspectapedia steam generator repair guide documents this exact test method for residential units.
Why your generator heats but produces little or no steam
A unit that heats without producing usable steam usually has one of four causes: a partially failed heating element, insufficient water reaching the tank, a faulty liquid level probe, or steam condensing in the line before it reaches the steamhead.
Distinguishing heating from delivery problems:
- If the unit cycles on and off but the steam room never gets humid, the element is likely working but steam is condensing in a long or uninsulated line.
- If the unit runs continuously without shutting off and no steam appears, the element may be partially shorted or the level probe is not reading correctly.
- If the unit starts, then shuts down quickly with a low-water code, the water feed or probe is the fault.
Step-by-step checks:
- Test element amp draw with a clamp meter around each element lead. A healthy element draws close to its rated amperage. An open element reads zero; a partially shorted element reads high and may trip the breaker.
- Inspect the liquid level probe. Scale deposits on the probe tip cause false low-water readings. Clean the probe tip with a descaling solution and a soft brush.
- Clean the water-feed strainer at the inlet. A partially blocked strainer reduces flow enough to starve the tank between cycles.
- Check steam-line insulation and pitch. Per the Steamist plumbing installation guide, runs over 10 feet must be insulated, and the line must pitch 1/4" per foot back toward the generator so condensate drains rather than pools.
For tanked consumer units, the Breville steam generator FAQ confirms that the most common no-steam cause is a low or improperly seated water tank, followed by incomplete priming. The temperature indicator must turn solid before the unit will produce steam.
Pro Tip: Touch the steam line near the steamhead after a 10-minute run. If it is cool or only warm, steam is condensing in the pipe before it exits. Insulating the run or correcting a low-spot trap in the line usually resolves this without any work on the generator itself.
Control panel, display errors, and what each code usually means
Control errors are often misread as generator failures. Before replacing any board or control, verify the cable and reset the unit.
Common error codes
- H2O: Low water detected. Check water supply, inlet strainer, and liquid level probe. Resetting after fixing the water supply usually clears this code.
- Err1: Communication fault between wall control and generator. Check the control cable for damage, pinching, or a loose connector at both ends.
- Err2: Water-related fault during operation, often caused by water draining out mid-cycle or a probe fault. Verify water feed continuity and probe cleanliness.
- Prr1 / Prr2: Pressure-related readings or probe faults depending on the model. Consult your model’s manual for the specific interpretation.
- Err7: High-temperature fault. The unit has exceeded its safe operating temperature. Allow full cool-down, verify the steam room thermostat setting, and check for a blocked steamhead.
The Mr-Steam Troubleshooting Guide provides step-by-step definitions and reset procedures for each of these codes, along with the expected voltage readings at the transformer and contactor that confirm whether the board is receiving proper signals.
Reset and cable inspection steps
- Power off the generator at the breaker for 30 seconds.
- Restore power and wait for the control to initialize fully before calling for steam.
- If the error returns, inspect the control cable along its full run. Look for pinch points at wall penetrations, staples, or mounting screws that may have cut through the insulation.
- Disconnect the cable at both ends and perform a continuity check on each conductor.
- If continuity is broken on any conductor, replace the cable before replacing the control board.
Physical damage to the control cable caused by mounting screws or pinched wiring is a frequent, non-obvious cause of persistent Err and H2O messages. Replacing the cable often resolves the fault without touching the board.
Replacing a control board without first ruling out a damaged cable is one of the most common and expensive diagnostic mistakes in steam generator repair. The board is rarely the root cause when a cable inspection has not been completed.
Strange noises, banging, or irregular operation
Unusual sounds from a steam generator are diagnostic signals, not just annoyances.
What each noise typically indicates:
- Knocking or banging in the steam line: Water hammer caused by condensate pooling in a low spot or an improperly pitched line. The steam hits standing water and creates a pressure shock. Correct the pipe pitch or add insulation to reduce condensation.
- Hissing from the cabinet: A small steam or water leak at a union, fitting, or the pressure relief valve (PRV). Inspect all visible plumbing joints inside the cabinet.
- Buzzing or clicking from inside the unit: A failing contactor. The contactor coil energizes and de-energizes the heating elements; a worn contactor chatters or fails to hold. This requires replacement by a qualified technician.
- Scale-stripping sounds (crackling or popping during heat-up): Heavy scale deposits breaking off the element surface. This is a sign that descaling is overdue.
Stepwise checks for noise diagnosis
- Feel the generator cabinet panels for vibration during operation. Vibration localized to one side often points to a single failing element or a loose mounting bracket.
- Inspect the steam line for visible low spots or unsupported sections that could trap condensate.
- Use a clamp meter to check element amperage. Uneven readings across elements indicate a partial short or a failing element.
- If the noise is a loud bang accompanied by a breaker trip, shut down immediately. A breaker trip with audible impact suggests a contactor failure or element short, both of which require professional service.
Detecting and fixing leaks, overflowing, or water at the steamhead
Water appearing at the steamhead or pooling under the generator cabinet points to one of several distinct causes, each with a different fix.
Common leak sources:
- Loose or cracked union fittings at the water inlet or steam outlet
- A faulty or stuck drain valve that does not fully close after an AutoFlush cycle
- A blocked drain valve that prevents the tank from draining, causing overfill
- A failed liquid level probe O-ring allowing water to seep around the probe body
- A water-feed solenoid that does not fully close, allowing continuous fill
How to isolate the source
- Dry the cabinet interior completely with a towel.
- Restore water supply and power, then observe for 5 minutes without running a steam cycle.
- If water appears immediately, the solenoid or inlet valve is not closing fully. Shut water supply and inspect the solenoid screen for debris.
- If water appears only during or after a steam cycle, check the drain valve and AutoFlush function. A stuck-open drain valve allows tank water to escape during operation.
- Inspect all visible plumbing unions inside the cabinet. Hand-tighten any that feel loose, then use a wrench for a quarter-turn more. Do not overtighten brass fittings.
- Check the steamhead itself. Water dripping from the steamhead after a session is normal condensate. Water flowing continuously during operation points to overfill or a stuck solenoid.
Pro Tip: Place a dry paper towel under each union fitting and under the drain valve before running a short test cycle. Wet spots on specific towels pinpoint the leak source faster than visual inspection alone.
Safe electrical tests and sensor diagnostics for technicians
This section is written for technicians and confident DIYers with a clamp meter and a multimeter. All tests assume power is off unless the test explicitly requires live voltage, in which case a licensed electrician should perform it.
| Test Point | Expected Reading | What a Bad Reading Means |
|---|---|---|
| Incoming supply voltage (L1 to L2) | 240V AC (±10%) | Below 208V: supply issue, call electrician |
| Transformer secondary output | 24–27V AC | Outside range: replace transformer |
| Contactor coil voltage (when called) | 24V AC | No voltage: board or cable fault |
| Element resistance (each, unpowered) | Per nameplate (typically 10–20 Ω) | Open (OL): element failed; very low: partial short |
| Element amp draw (clamp meter, live) | Near rated amperage | Zero: open element; high: partial short |
| Liquid level probe (resistance to ground) | High resistance when dry | Low resistance when dry: probe fouled or shorted |
Force-on and WLS test procedure
- With power off, locate the WLS (water level sensor) terminals on the control board.
- Temporarily short the WLS terminals with a jumper wire to simulate a water-satisfied signal.
- Restore power briefly and observe whether the contactor engages and the elements draw current.
- If the contactor engages with the WLS shorted but not during normal operation, the liquid level probe or its wiring is the fault.
- Remove the jumper and restore normal wiring before leaving the unit.
The Inspectapedia steam generator repair guide documents this test method and confirms that verifying transformer secondary voltage (24–27V AC) before replacing a control board prevents unnecessary board replacements.
Pro Tip: A replacement temperature probe compatible with iSteam, AirTempo, iTempo, and iTempoPlus controls is one of the most cost-effective first swaps when a temperature-related error persists after cleaning. Probes fail gradually and often produce intermittent errors before failing completely.
All tests involving incoming 240V service wiring, contactor replacement, or transformer replacement must be performed by a licensed electrician. The tests in this section that require live voltage are for qualified technicians only.
How to descale, flush, and maintain your steam generator
Scale is the leading cause of premature element failure and low-steam output in hard-water areas. A consistent maintenance schedule prevents most of the problems covered in this guide.
Step-by-step descaling procedure
- Shut off power at the breaker and close the water supply shutoff.
- Open the drain valve and allow the tank to drain completely.
- Remove the access panel and inspect the element and probe for visible scale deposits.
- If the element is heavily scaled, remove it per your model’s service manual and soak it in a manufacturer-approved descaling solution (white vinegar diluted 1:1 with water works for light scale; commercial citric acid descalers work faster on heavy buildup).
- Clean the liquid level probe tip with the same solution and a soft brush. Do not use abrasive pads.
- Flush the tank by briefly opening the water supply with the drain valve open, then close the drain.
- Reassemble, restore water supply, and run one full steam cycle to flush residual descaler before using the steam room.
- Inspect the AutoFlush function if your unit has one. A clogged ball valve in the AutoFlush line prevents proper draining after each session and accelerates scale buildup.
Routine maintenance schedule
- Monthly (hard water areas): Inspect the liquid level probe and clean if scale is visible.
- Every 3 months (moderate water): Drain and flush the tank; inspect the inlet strainer.
- Annually: Full descaling procedure, visual inspection of all plumbing unions, control cable inspection, and element amp-draw test.
- After any extended shutdown: Prime the unit and run a short test cycle before a full session.
Pro Tip: A simple DIY water hardness test strip (available at hardware stores for a few dollars) tells you exactly how aggressive your descaling schedule needs to be. Water above 200 ppm total dissolved solids warrants descaling every 3 months regardless of usage frequency.
Installation and placement errors that shorten service life
Many recurring steam generator issues trace back to installation decisions made on day one, not to component failures.
Manufacturer-required placement rules:
- Mount the generator upright and level. Tilting the unit causes the liquid level probe to read incorrectly, triggering false low-water alarms or preventing the unit from sensing water at all.
- Provide at least 12 inches of clearance on the service side of the unit. The MrSteam plumbing FAQ confirms this requirement and notes that “zero-clearance” cabinet installations still need service access, which means a removable panel or door must be planned from the start.
- Install the unit indoors in a non-freezing location. Freezing temperatures damage the tank, valves, and electronics. Unheated attics and garages are not acceptable locations.
Piping requirements:
- Use 3/4" copper or brass for the steam outlet. Per the Steamist plumbing guide, PEX is not rated for steam and must not be used on the steam outlet line.
- Pitch the steam line 1/4" per foot back toward the generator so condensate drains rather than pools.
- Insulate steam runs over 10 feet to prevent condensation losses.
- Do not install shutoff valves in the steam outlet line. Traps and U-shapes in the steam line cause water hammer and PRV activation.
- Use unions on all plumbing connections to allow future service without cutting pipe.
Installing a steam generator in an unheated space or without service clearance does not just risk a warranty void — it guarantees a service call within the first two seasons. Freezing cracking a tank or a technician unable to reach the unit are both entirely preventable with correct placement from the start.
Pro Tip: Plan service access during the rough-in phase, not after the walls are closed. A simple access panel on the adjacent wall costs almost nothing during construction and saves hours of drywall work on the first service call.
Printable on-site diagnostic flow
Use this sequence on-site to move from symptom to root cause without backtracking.
Step-by-step diagnostic sequence
- Confirm power: Breaker on, GFCI reset, supply voltage within range. If power is absent or voltage is low, stop here and address the electrical supply.
- Check the display: Note any error code before resetting. Write it down.
- Reset the unit: Power-cycle at the breaker for 30 seconds. Call for steam. Did it start? If yes, monitor for recurrence. If no, continue.
- Check water supply: Shutoff valve open, inlet strainer clean, water pressure adequate. For tanked units, tank filled and seated.
- Test the control cable: Disconnect at the generator end. Use the onboard test button to call for steam directly. Generator runs on test button but not through control? Cable or wall control is the fault.
- Check for error codes: Use the error-code lookup in the controls section above to identify the specific fault.
- Inspect the liquid level probe: Clean if scaled. Short the WLS terminals temporarily to test contactor engagement (technicians only).
- Test element amp draw: Clamp meter on each element lead. Zero reading means open element. High reading means partial short.
- Inspect plumbing: Check all unions, the drain valve, and the steam line pitch and insulation.
- Decision gate: If the breaker trips again, wiring is scorched, or the contactor or transformer tests bad, stop and call a licensed electrician or plumber.
Decision guide:
- Homeowners can safely handle: breaker reset, GFCI reset, water supply checks, control cable inspection, descaling, probe cleaning, and tanked-unit priming.
- Technicians can add: element resistance and amp-draw tests, transformer voltage checks, WLS jumper test, and control board swap.
- Licensed electricians only: incoming service wiring, contactor replacement, transformer replacement, and any work on energized 240V terminals.
When to stop and call a licensed technician
Some faults are outside the safe scope of homeowner or general technician repair.
Call a licensed electrician when:
- The dedicated breaker trips repeatedly after reset, especially under load.
- You find scorched, melted, or burned wiring inside the cabinet.
- The contactor or transformer tests bad and requires replacement.
- Incoming supply voltage is outside the acceptable range and the issue is upstream of the generator.
Call a licensed plumber when:
- A significant water leak cannot be isolated to a union or fitting you can safely tighten.
- The PRV (pressure relief valve) is discharging repeatedly, which signals a pressure control problem.
- The drain or AutoFlush line is connected to a drain that does not meet local plumbing code.
Commonly replaced parts and their failure signs
- Heating elements: Fail open (zero amp draw) or short (high amp draw, tripped breaker). Replacement requires draining the tank and removing the element flange.
- Contactors: Fail to engage (no heat despite correct signals) or chatter and burn. Visible pitting on contacts is a clear sign.
- Transformers: Output voltage outside 24–27V AC range. Usually replaced as a unit.
- Liquid level probes: Scaled or corroded tip causes false low-water codes. Clean first; replace if cleaning does not restore correct readings.
- Control boards: Replace only after ruling out cable damage, probe faults, and transformer output issues.
- Solenoid valves: Fail open (continuous fill, overfill) or fail closed (no water entering tank). Debris in the screen is the most common cause before full valve failure.
- Control cables: Physical damage from screws or pinching causes intermittent or persistent Err and H2O codes. Inexpensive to replace and often overlooked.
Extended error codes beyond the standard display faults
Most residential steam generators share a common set of error codes across brands, with slight variations in display format.
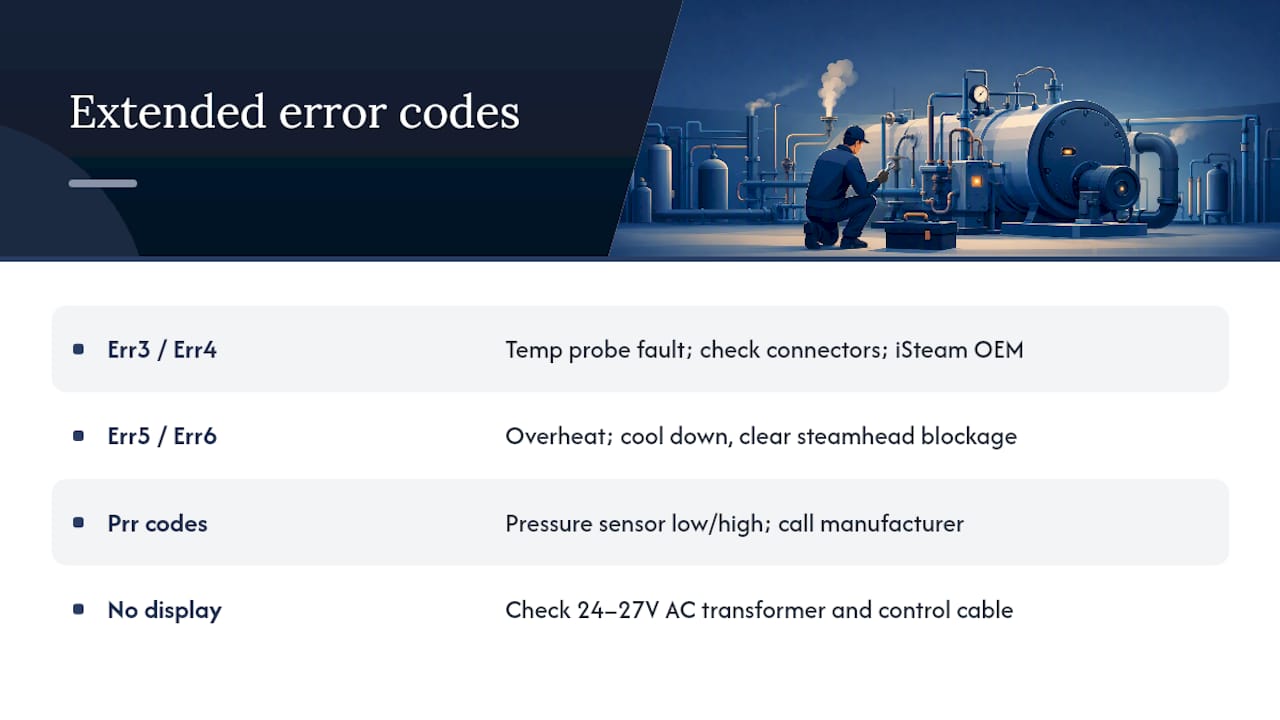
Err3 / Err4: These codes typically indicate a temperature sensor fault or an out-of-range temperature reading at the steam room probe. Check the temperature probe connection at the wall control and at the generator. A loose connector or a probe that has been painted over or physically damaged will produce these codes. The iSteam temperature probe compatible with AirTempo, iTempo, and iTempoPlus controls is the OEM replacement for this fault on those platforms.
Err5 / Err6: Overheat or thermal cutout codes. The unit has reached or exceeded its maximum safe temperature. Causes include a blocked steamhead, a steam room that is too small for the generator’s output, or a thermostat set too high. Allow full cool-down, clear any blockage at the steamhead, and verify the room size matches the generator’s rated cubic footage.
Prr codes: Pressure-related readings that vary by manufacturer. On some platforms, Prr1 indicates a pressure sensor reading below the expected range at startup, while Prr2 indicates a reading above range during operation. Both warrant a call to the manufacturer’s technical support line with the full model number in hand.
No code, no display: If the wall control shows nothing at all, check the low-voltage transformer output (24–27V AC) and the control cable continuity before assuming the control board has failed. A dead display with a working generator usually points to a cable or transformer fault, not a board failure.
Troubleshooting thermostat problems in steam generators
The thermostat in a steam generator controls when the unit calls for heat and when it shuts off. A faulty thermostat produces symptoms that look like element failures or control board faults, which is why it is often misdiagnosed.
Symptoms of a thermostat problem:
- The unit runs continuously without shutting off even after the steam room reaches the set temperature.
- The unit shuts off too early and the room never reaches the set temperature.
- The unit cycles on and off rapidly (short-cycling) rather than holding a steady output.
- The wall control displays the correct set temperature but the room temperature measured by a separate thermometer is significantly different.
Diagnostic steps:
- Place an independent thermometer or hygrometer in the steam room at seated height. Compare its reading to the wall control’s displayed temperature. A consistent discrepancy of more than 10°F points to a probe calibration issue or a probe that is mounted in the wrong location (too close to the steamhead or in a cold draft).
- Check the temperature probe connection at the wall control. A loose or corroded connector causes intermittent temperature readings that produce erratic cycling.
- On iSteam, AirTempo, iTempo, and iTempoPlus controls, the temperature probe is a separate, replaceable component. If cleaning the connector does not resolve the discrepancy, swap the probe before replacing the control.
- Verify the steam room’s cubic footage matches the generator’s rated output. An undersized generator in a large room will run continuously trying to reach the set temperature, which mimics a thermostat fault.
- If the unit runs past the set temperature and does not shut off, the high-limit thermostat (a separate safety device from the room thermostat) may have failed in the closed position. This requires professional service.
For a broader comparison of steam room and sauna heating approaches and how thermostat placement affects performance, the steam room vs. sauna guide on Saunaheatersupply covers the key differences in heat delivery and control strategy.
What years of steam equipment work actually teach you
The most consistent pattern across steam generator service calls is not a failed component. It is a preventable installation mistake that was never corrected. Units installed in unheated utility closets, with control cables stapled through drywall, and with steam lines running through cold spaces fail on a predictable schedule regardless of brand or price point. The MrSteam field FAQ puts it plainly: generators installed in freezing or excessively moist environments have shortened lifespans, and no amount of service work changes that outcome while the root cause remains.
The second pattern is deferred maintenance. Descaling is the one task that homeowners consistently skip until the unit stops producing steam. By that point, scale has usually bonded to the element surface hard enough to require element replacement rather than just cleaning. A $15 descaling treatment done annually is a straightforward trade against a $200 element replacement.
Saunaheatersupply stocks OEM controls, temperature probes, and steamhead assemblies for the most common residential platforms. If you are working through a repair and need the right part the first time, the product pages include compatibility information so you are not guessing.
Get the right replacement parts without the guesswork
When steam generator troubleshooting points to a control, probe, or steamhead replacement, getting the correct OEM part matters more than getting the cheapest one. Generic replacements often use different connector pinouts or calibration curves that produce new error codes immediately after installation.

Saunaheatersupply carries the iSteamX Steam Shower Control and Steamhead, the iTempo Round Steam Shower Control and Steamhead, and the temperature probe for iSteam, AirTempo, iTempo, and iTempoPlus controls — all OEM-compatible replacements for the most common residential steam shower platforms. For homeowners completing a full steam room setup, the SaunaLife Bucket, Ladle, Hygrometer and Thermometer and the SaunaLife Accessory Package 7 round out the space with the monitoring tools that make thermostat verification straightforward. Browse the full parts catalog at Saunaheatersupply or contact the support team directly for compatibility confirmation before ordering.
Sources
The following resources provide model-specific error codes, wiring diagrams, and installation specifications that go beyond what any general troubleshooting guide can cover:
- Mr-Steam Troubleshooting Guide
- Steambath generator repair diagnose trouble with a residential steam generator
- TSG/SMP Plumbing Installation Guide
Recommended
- HUUM Electric Sauna Heater Warming Up Too Slowly: Complete Guide To Fi — Sauna Heater Supply
- Finnmark FD-4 Trinity Infra-Steam Sauna — Sauna Heater Supply
- Finnmark FD-5 Trinity XL Infra-Steam Sauna — Sauna Heater Supply
- Steam Room vs Sauna: What Homeowners & Contractors Should Choose — Sauna Heater Supply